SellerSEO is a full Amazon optimization platform. Our tools allow you to boost sales and ROI while saving time. We can optimize you listing, create PPC campaigns, and even automatically reduce your Amazon PPC costs while increasing profit. Find the best keywords with real Amazon search volume, track your daily keyword rank and BSR rank, and even build you off-site traffic campaigns in under 5 minutes and more!
 30% OFF
SellerSEO is presented by the founder Andy Arnott.
Related links:
List of features covered in this video:
00:00:28 What is SellerSEO software, and how does it help Amazon sellers?
00:01:57 Marketpaces covered by SellerSEO
00:03:08 ACOSinator tool Overview
00:06:09 Source Force tool Overview
00:07:36 How can we use Listing Lightning tool?
00:10:32 How to build a highly optimized listing in under an hour?
00:16:59 How to use these two separate titles in Listing Lightning tool, and why are they separated?
00:23:23 What are Back-End keywords?
00:27:07 The function of Keyword Miner tool
00:29:30 Index checker tool Overview
00:34:38 What is Rank Rocket tool, and how does it work?
00:37:47 PPC Dominator tool Overview
00:43:49 What is the function of Rainmaker tool, and how is it connected to PPC dominator tool?
00:58:34 How does Traffic Titan tool work?
01:06:42 How does the new version of Keyword tool look like?
01:14:48 What are the services that SellerSEO planning to release in the next month for the users?
01:14:12 Pricing of SellerSEO
01:17:42 What is the best way for users, and for potential customers to get in touch with SellerSEO support team?
01:19:11 Free Trial
01:19:16 Offer: coupon code DEMOMONDAY to get 30% off your subscription
Transcript – Walk-through of SellerSEO
[00:00:00] Augustas: Welcome back to another session of Demo Mondays. Demo Mondays is a video series presented on Mondays, where I invite Amazon seller software creators and founders, and ask them to present their products just like this on the screen.
[00:00:13] Augustas: And today my guest is SellerSEO, and it’s presented by the founder Andy Arnott.
[00:00:25] Augustas: Hello Andy.
[00:00:27] Andy: Hey Augustas, how are you?
[00:00:28] Augustas: I’m good, thank you. So let’s start from the beginning. What is SellerSEO software, and how do you help Amazon sellers?
[00:00:39] Andy: Well, SellerSEO is an optimization platform, and what we did is we tried to build in kind of every tool that we could think of that would help you, on the optimization side of your Amazon business. So things like rank tracking, index checking, PVC, off site traffic, what your profits are going to be, and kind of everything we could think of that would give you an advantage over other sellers. But we also tried to make it extremely powerful but also very easy. So kind of the whole slew of Amazon sellers, whether you’re a beginner or advanced, you shall get a lot of benefit from our tools.
[00:01:21] Augustas: You already answered my next question, which was, what is the ideal customer of your software. So you say it’s for everyone.
[00:01:31] Andy: Yes. It’s definitely for people starting out and even advanced sellers. If people are just starting out, it’s going to help them because they probably don’t have the knowledge on how to do a lot of these things on their own. So this automates a lot of those processes. If they’re advanced, the reason why they’d want to use us is that it’s just a huge time saver. So it wouldn’t matter what kind of style you are, you would get some good benefits from using our software.
[00:01:57] Augustas: And for international users, it’s important, which marketplaces are covered by you?
[00:02:02] Andy: Right now, we’re just Amazon.com, the USA market, but we are working on international, and I don’t think it should be too much longer, I would say within the next month, two months at the most, where we should have support for at least Europe and then hopefully we will go from there.
[00:02:20] Augustas: All right perfect. Sounds interesting. Let’s Jump to the screen sharing, and see how SellerSEO looks like.
[00:02:27] Andy: Okay, perfect. So I’m just going to go from top to bottom on our tools, and give you a demo of how each tool works, and why you would use them and the benefits. So as you can see here, we’ve got, I think we’re up to 9 tools now. Yes, 9 tools on the site itself. And then we also have a chrome extension that we just released a keyword tool. That’s super powerful, and we’re really excited about as well, especially because it’s 100% free. And most software providers that are giving you a real search volume for Amazon keywords, are charging you for that, so we’d give it to you free, which is pretty awesome. So anyway, we’ll go ahead and start at the top.
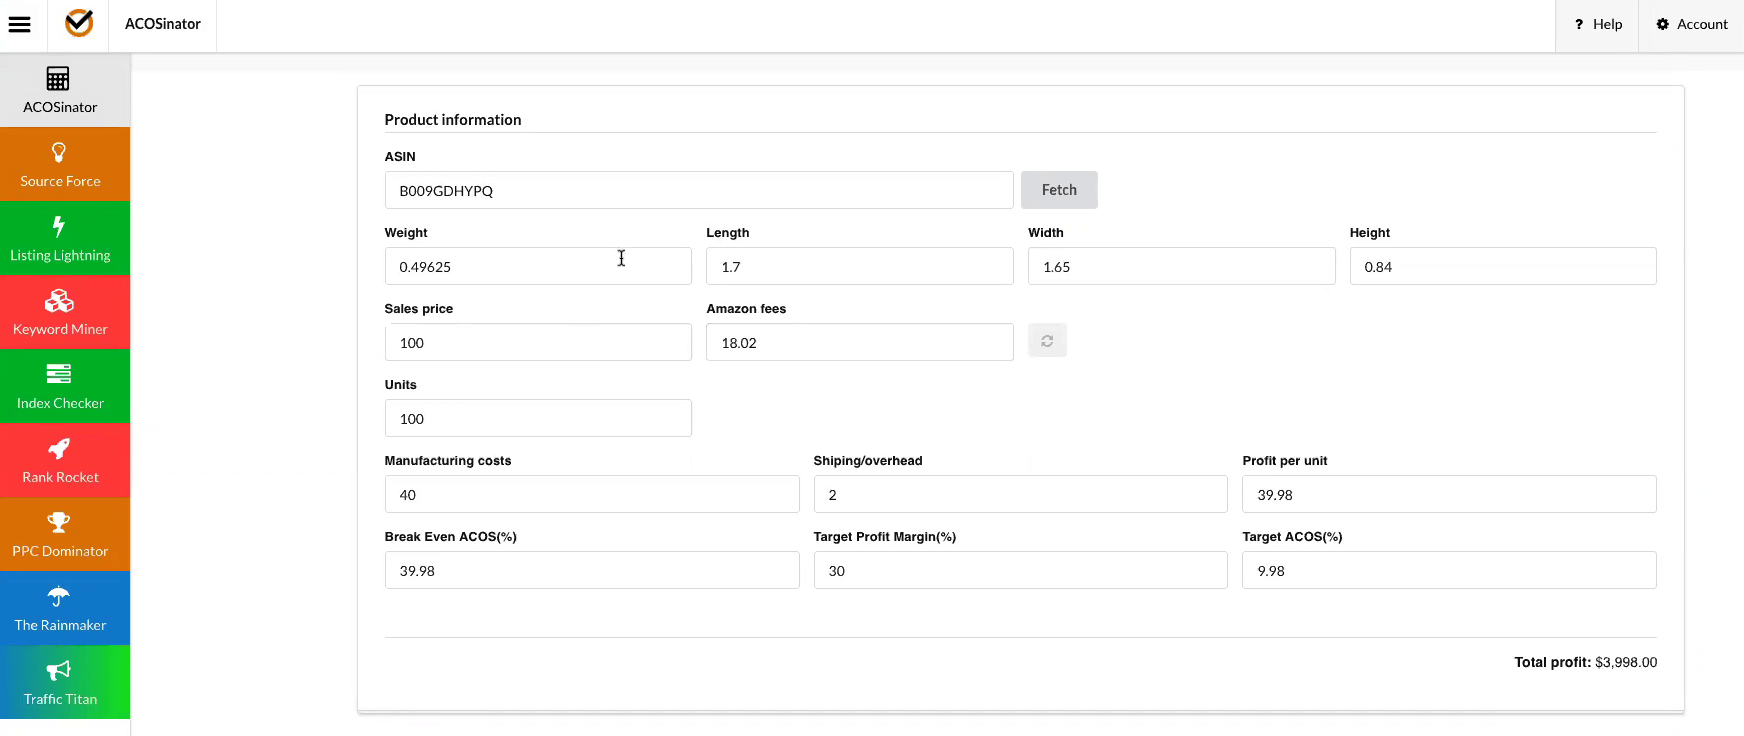
[00:03:08] Andy: The first tool is the ACOSinator and what this does, is that it lets you kind of figure out how much you’re going to make from a certain product by selling on Amazon. So the first thing you would do is we have an example ASIN in here, but you can of course a paste any ASIN in here that you wants, you go ahead and hit fetch. And what that does is that it will pull an API, it’ll get the weight, the length, the width, the height, things like that, the sales price, what you’re going to pay Amazon fees. And then what you can do yourself is you’re going to want to fill in a couple of values here. So first thing you’re going to do is manufacturing costs. Now the sales price is $170. So we’re going to estimate our manufacturing cost on this product, even though it’s not mine.
[00:03:48] Andy: I’m going to guess, let’s say it’s $40, shipping overhead. We’re going to say it’s $2 per unit to get this product to Amazon Fba. And let’s say our target profit margin is 30%. So what you can see here is that we’ve kind of given you some good data here. So first thing is, we’re giving you your total profit. If you sold 100 units of this product, minus fees on Amazon, and then we’re also giving you a couple of other things which a lot of people seem to have trouble figuring out, which is your break even ACOS. So if you sold this ACOS on PBC. So if your PBC costs were in ACOS of 58.52%, you’d be breaking even.
[00:04:36] Andy: And then this would be your target ACOS which would be 28.52%, if you wanted a target profit margin of 30%, so if you wanted to make 30% on everyone you sold, the most you’d want to spend on advertising is a 28.52% on the ACOS value. So why this is useful, is because you can even use this beforehand, like say you are getting a source, a set of crayons, what you can do is you can plug in the weight manually, the length, the width, the height, and your sales price. So you can plug all that data in and then you hit this recalculate year. I’ll just change the sale price here so you can see what I’m talking about. So the sale price is 100 bucks.
[00:05:22] Andy: You hit recalculate there and then it gives you a new fee value, and it will update all the other values down here, and your total profit. Now this is cool. This is before you even ordered the product from your manufacturer. You can kind of get an overview of all the numbers involved in selling this product on Amazon, what your break even ACOS is going to be, what your target ACOS is going to be, and this will really help avoid, sourcing a product where you’re not going to be making any money or you’re not clear on all the values. So that’s the ACOSinator tool and this tool is of the tools that we offer for free. So if you sign up for our service, which actually, I would suggest you do that before you watch this video or have you started watching this video now, maybe pause it and go and sign up.
[00:06:09] Andy: The reason I say that is we have a 30 day free trial and so you can actually step through all of these tools while I do it and kind of learn, and then you have 30 days to try to see if it benefits your business without any risk. But even within those 30 days, if you cancel, you get this tool. And then the next one, I’m going to demo you which is a Source Force tool absolutely free. So I definitely recommend that you go and do that. So the next one, we’re going to go to Source Force. Now this is a sourcing tool, so if you want to go through and try to find products maybe that have bad reviews or maybe there’s an underserved market. And what we can do here is we can just select some categories.

[00:06:49] Andy: Let’s do office products, pet supplies, sports and outdoors, maybe tools and home improvement here. And we’ll say we want something with a less than 10 reviews because that might be a market that we can get into fairly easily. And then we go ahead and hit filter, and we’ll get a nice list of products. We’ve got a bunch of products here that we can look to see, and see if we want to source these. The other cool thing here is we can also sort by price too. So if we want to make sure that each product is more than $20. So this is similar to a lot of the tools that you’re used to for sourcing, this tool though, like I said, is completely free, so you can jump on here and use this tool for free to do some of your sourcing research.

[00:07:36] Andy: Now, these first two tools, I’m not going to go too much into because, I think that you could definitely, like I said, these are free tools so you can just jump on, sign up and play with them yourself, and get a good idea of how these tools work and how they’re going to benefit you. The next tool is what we feel is one of our best tools and absolutely essential, and I know in our business and in a lot of our users, this is one of the favorite tools, and I’ve not heard one person using this tool hasn’t had success in the way of increased rank and visibility, and a better search rankings, and things like that. So what’s cool about this tool is so like there’s some other tools out there where you have to do a bunch of different steps.
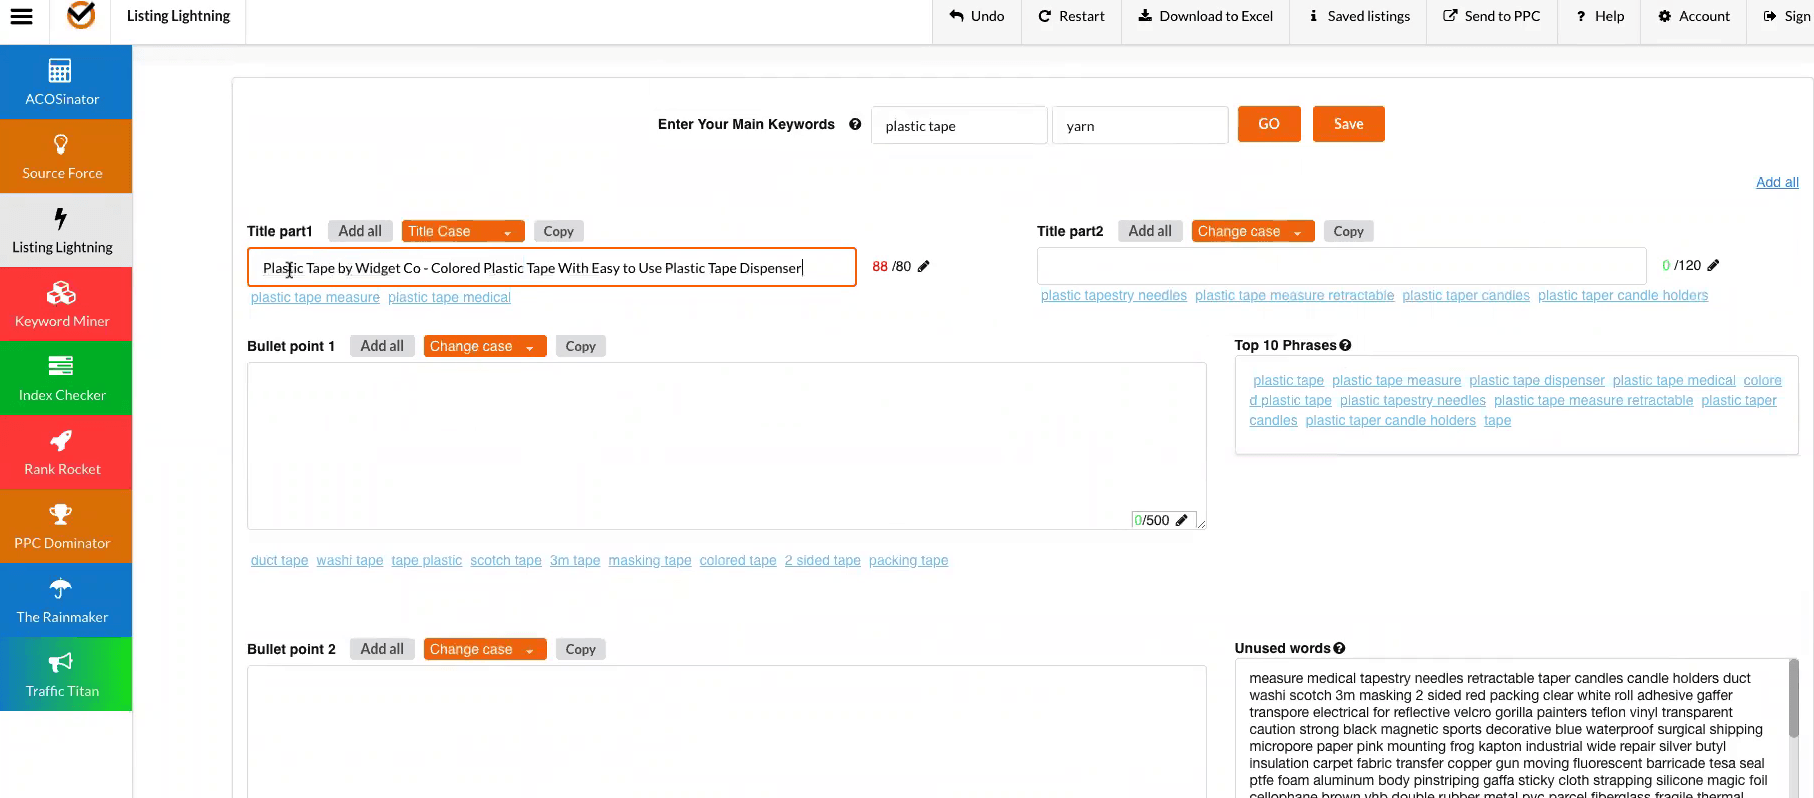
[00:08:21] Andy: So you got to do keyword research, then you got to do a reverse ASIN searches, then you have to do a check search volume, and there’s about 4 or 5 different steps that you have to take before you even start writing your listing. And what we’ve done is kind of automate all those things. So we have a bunch of different data points and what those data points will do when we pull them in. We have an algorithm that pulls those data points, and then we crunch them. And then we actually lay out for you, I’m exactly where to place your keywords and which keywords are the most important just by the way we placed them. So right here, what I’m going to talk a lot as an example in this demo is going to be a plastic tape or like a packing tape.
[00:09:05] Andy: So let’s do plastic tape though. So let’s do plastic tape. And what you want to do here is like this says, it says enter your main keyword. So it says, enter at least two words that most describe your product. So you wouldn’t want to just put on tape here, because there’s so many different types of tape, you kind of want to drill down a little bit more and make it a little bit more relevant because if you just put tape in there, you’ll get a whole slew of tape, keywords that won’t be relevant for your specific product. So we use at least to two keywords here. So negative search terms would be like, if you want it to exclude something like say you don’t want any words related to like duct tape, you could put duct in here and then we would exclude any key words below that might contain the word duct because you don’t want to use that.
[00:09:49] Andy: But for now I’m just going to leave it the way it is. We go ahead and hit go. And what we’re doing right now is we’re actually pulling all our different data points, as you can see here, it takes a little bit about 15 seconds, sometimes more, and now what you can see as a result, and this is what’s really cool and that nobody else I know of is doing this type of formatting where it gives you everything in an easy to use interface, and you can build listings. I know that when we were doing list of things manually before this tool, sometimes it would take us up to like 6 hours to go ahead and do all the keyword research, sometimes days actually, depending on how specific and how important that product was, how much time you wanted to spend on that product.
[00:10:32] Andy: But this cuts it down. Now, generally when we use this tool, we can build a highly optimized listing in under an hour.
[00:10:37] Augustas: So the data, are you taking it directly from Amazon or is it your internal data?
[00:10:45] Andy: We have some internal data and we pull multiple data sources from Amazon. So we have, I think a total of 5 different data sources that we’re using to compile this and then our algorithm kind of grades it, and then ranks it and then puts it on your thing here. Now we can see here right now that we got some stuff that might not be a super relevant, like we got a tapestry needles, we don’t want that. So let’s go ahead and get rid of yarn here, and let’s do that again, and that’ll get rid of stuff that’s irrelevant for this listing.
[00:11:28] Andy: Okay. So we got that now and we got rid of the yarn, and so now we got some super relevant stuff leftover. And so now we get to work. Now what we do is we actually have as you can see here, some of phrases and what we want to do is place them. So we got title, part one and part two. The reason we split the title here is because you can also use this tool to optimize, say like your Shopify listings or your email listings. Generally those have a shorter title. So here we got two sections, so you can build the first part of your title here, and then the second part of your title here, so that it would work with Shopify or Ebay or any other type of ecommerce like Walmart, things like that.
[00:12:07] Andy: So that’s why this tool is a specialty versatile. So we’d get to work here. So the first thing that we do is we can see a plastic tape is the most important word which makes sense, followed by a plastic tape dispenser, plastic tape medical that might not be super colored plastic tape. So we’d start building. So how we do that is we just start clicking in, we could say, plastic tape by widget co. And so the other cool thing is that we can highlight this text, and we can change case and we can say we want these capitalized and so we can easily do that, and then we keep going, let’s see colored plastic tape, we can capitalize that, we can do this all. You can change just a specific part so you can highlight something and just change, like if you wanted these all caps or you want to go back to a capital case, things like that.
[00:13:03] Andy: So you can edit the text once you drop it there. So what you’re doing, using this tool in essence is we’re giving you all the keywords but you have to kind of fill in the blanks in between the keywords and like I said, this is guiding you though to make sure that you, build a highly optimized listing. Most people wouldn’t even know where to start and doing this, and we’re making it super simple and quick and easy to do this. So we’re going to keep building, and we can see some other things here, duct tape, plastic tape and scotch tape. So we’re going to go down here, since some of these are not relevant to our product, we can go back and do comma separated here and add more keywords or you can just skip over them.
[00:13:47] Andy: I like to just skip over them, but if you’re a visual person and you want to make sure that you’re only adding stuff that’s relevant to your product, you can go ahead and filter them out there. So here is colored, plastic tape and then we keep going. Let’s see, tape plastic, are you sure you want to put this phrase into title one? Yes. So if you jumped keywords to a different section. So because I was up in the title, but I was adding some stuff from bullet point one, it’s going to make sure that I confirm that, which I did. And so what we do is we keep building this out and adding phrases. Now, this might not make sense. Plastic tape by widget co, call it plastic tape or tape plastic, this doesn’t really make sense. So of course I’m not going to spend a ton of time showing you exactly how to optimize this listing because, that would be boring for you, but what you’d want to do is to fill in the blanks, like I said, so colored plastic tape with easy to use. Let’s see, maybe we say, plastic tape dispenser. So here we go with easy to use plastic tape dispenser that we can go back, and highlight all of it again. And so we keep building like this. Now, some things that you can see here is you’ve got some hover points. So of course we got one up here that says, use at least two words. You’ve got top 10 phrases here which says, use these phrases in multiple locations. So that means, we want to use it. Plastic tape is our most important phrase, which it is right here. That means that we want to make sure that we use it in bullet point one, bullet point two. So in multiple places, these are also clickable. So we can go ahead and click that and drop it in bullet point two if we wanted, if we want to make sure that we don’t forget to add that you can go down to bullet point four, and go ahead and drop that again.
[00:15:40] Andy: Now another thing that’s kind of cool is as you build the listing, as you go down the box has dropped down, so they continue with you down the screen, and then you can also see, there’s another hover box down here, unused keywords, and these are words that have not been added to your listing yet. They may not have been ranked high. So in other words, we probably excluded them in the main parts of the listing here, but they still may be irrelevant. So these are things that you might want to add after the fact.
[00:16:13] Augustas: Could you explain the title part one and part two, what are these?
[00:16:19] Andy: Sure. So this is actually title part one and part two, are just the title. So this is just like you’re building your title for Amazon, but like I said, we’re splitting them into two different parts. But, as you can see here, I went over to 88 characters, so because I know that Amazon is 200 characters, I can go ahead and change this, so I can make this 90. So it’s saying I’m using 88 out of 90 characters and then over here I can reduce this to 110. And so I would keep building. So I’m over here, but then I’m going to keep building here.
[00:16:59] Augustas: How do these two titles work? How do you use these two separate titles?
[00:17:03] Andy: Well, so they’re separated on the tool, but when you export them, you would just add them together. So in other words, if you were building for Amazon, you would add these together, if you were building for Ebay or Shopify, then you would just take part one of the title, because those usually have lower limits on the characters, the other reason that you would want to possibly separate these is because this title will show up on mobile and this one will not on Amazon. So that’s another reason why we did this separation. Does that make sense?
[00:17:39] Augustas: Yes, of course.
[00:17:40] Andy: Alright. So then we, we keep building this thing and let’s try a different one just to make it fun. So the other thing you can do too is if you use plastic tape and say you’ve entered a bunch of phrases into the boxes, but you think that maybe, plastic tapes are good, but maybe packing tape might be a better main keyword.
[00:18:08] Andy: You can go ahead, and enter that and then will go through here, and we’ll do the calculations again. And there we go. So we got a bunch more results now and actually in this case it looks like the results are a lot better. So that’s another thing you can do, you can try a couple of different keywords and just kind of scroll down and see if you like those results better. And the other thing you can do, like I said, as you can just combine results so you can take this now and continue building because I like these results better. So we’re going to go and keep going. Tape dispenser, I’m going to add a space in there. Now as you can see too, as we add keywords, even if we’re not clicking drop them in there, they’re going to automatically disappear from here as well. So like for example, if I typed in packing tape refill like that, you see a dropped out of there. So it will also drop out if you manually enter keywords. So this way you know, you’re not repeating phrases, so we would just keep continuing this, building this title and then down to the bullet points and then down. So we’ll go, let’s see here. Packing tape refill.
[00:19:25] Andy: Maybe includes, includes packing tape refill, and then get your bulk pack now. So they were selling a bulk pack, and it comes with all these different accessories. So we’d go ahead and add those into the title, and we would keep building this out. Now we still have 30 characters left, so we’d want to try to continue to use these keywords. And then we can say kind of at the end here, it looks like packing tape heavy duty, amazing. Now some of them might not sound perfect. So amazing Packing tape, heavy duty construction for heavy duty, and we can do heavy duty strength. All right. And then we’ll go ahead and highlight all that area. Will do cap case on all of these. All right, so now we’ve got all this.
[00:20:33] Andy: So we got our title built. We can see here that this is a great title because it may not read perfect, but it reads fairly well and we’ve got all these fantastic phrases included in the title now. So the other thing that we can look at here, we got 90 out of 90 characters, here’s what we wanted and we have 109 out of 110 characters. So this is perfect. This is a super optimized listing. Now the other cool thing is like as we’re going here, we want to make sure that we’re saving our progress, maybe not losing it. You can go ahead and hit save. We can either enter an ASIN or a title of the save. If you are doing an ASIN, will actually pull the rank and you can go back and look at the rank. So if you build a listing and save it and then you come back and change some things and save it again.
[00:21:16] Andy: It’ll actually take a snapshot of your rank when you make the change. So you can go and look and see if it looks like that change was a positive change or a negative change, which is pretty cool. Alright, so then we’d keep building. And so bullet point one, we can say ultra strong, and then it looks like clear tapes, a good one. Ultra strong clear tape. Perfect for shipping tape. Perfect for box shipping tape. And then we can go on there, and then maybe say we want this all upper case to get more attention. We can go ahead and do that. And then we keep building. So we do the same process all the way down. Like I said, we want to repeat this packing tape. So maybe here we can say, will click on that again, will say a packing tape, that will be useful for all your shipping needs.
[00:22:17] Andy: And then we can say this clear packing tape will get the job done. Okay, so you can kind of get the idea here is where we’re building our listing, we’re dropping in a important phrases as we’re building the listing and we’re adding important phrases. Now we would continue to do that for all the different bullet points all the way down to our description course down here, we’ve got a bunch more suggestions here. Now the more of these phrases that you can kind of get into your listing without it looking too spammy or not reading well, that’s kind of what you want to do. And the great thing about this tool is that you can do that by dropping these things. And so you can see like masking tape, a packing tape dispenser. Now you can see a lot of tools and a lot of people say you shouldn’t be repeating key words, and that can work in some instances, but generally because of the recent algorithm change with Amazon, they’re actually taking relevancy into account a lot more.
[00:23:23] Andy: So, not only do you want to use phrases over keywords, but you also want to make sure that you’re repeating important phrases throughout the listing. What this does is that tells Amazon that this is relevant. So in other words, if you’re using plastic tape or your main keyword, you want to use that in a bunch of different places so that Amazon goes, plastic tape is very relevant to this listing. If somebody searches for plastic tape, we’re definitely going to show this listing, so we keep building and we go all the way down to the description, and then we go all the way down to backend keywords. And once again, with backend keywords, these are ones that we’ve not used yet. So we got rolls, we got gun, we got brown, we got Scotch, we have packing, we’ve got adhesive industrial, all these things, so we can literally just hit at all.

[00:24:07] Andy: And then that will fill in our backend keywords. Now here, we’re not at 250 characters, so the other thing we can do here is we can maybe copy some of our unused keywords over here and we can drop them in here. And now what that’ll do is we got 298, and we can go back through here and maybe delete something, like width, reinforced, that sounds pretty like a pretty good on bot. That might be a brand, we might not want that. So we can go through and kind of edit this, but we’ve already given you all the backend keywords, so it’s super easy to drop those in and then start building, now once again, like once you’ve made the save, you can save this again because you just added to it.
[00:24:52] Andy: So just like the original, your original is saved, so you can do that again, you’re going to go up. Hold on one second. Let me do that here. So you can say plastic tape again or like I said, if you’re using the ASIN, and you can drop that in there. So we’ll save it again, but then we get up to here to save listings. You can see here we got plastic tape, and we got two versions so we can go ahead and click on that and it’ll tell us, hey, do you want the version that you first made or do you want the latest version? So I can drop back to a previous version or I can jump forward as well if I went back, which is really handy to check with your rank or if you want to make edits to your listings.

[00:25:33] Andy: And this also works really well. Like if you’re a consultant, and you’re doing work for other Amazon sellers, you can save all those listings and go back and edit them super easily, which makes it a lot easier than a lot of the other tools out there where you kind of have to start from scratch if you don’t like what you have or if you want to make changes. The one last thing I do want to show you, so once you’re done, you can do a couple of things. You can copy these sections and then paste them into Amazon. So literally hit the copy button that section is pasted. The other thing you can do is download, do an excel file. So once again, like if you had clients or if you want to save this locally, you can go ahead and do that.
[00:26:11] Andy: That would save it to an excel file. All the different sections here along with the keywords, but the other really cool thing. So we have the Rainmaker tool, which we’ll go more into later, but I’m going to show you what you do is once you’ve got this listing bill, you can literally click send to PBC here. And what that’ll do is interest dropped all those keywords that we just use to build out listing into our keyword section here, so we can literally build a PVC campaign in like under a minute just by using those keywords that we already pulled from our algorithm ranked on a popularity. So that’s super useful, and we’ll come back to that when we get to that tool. So that’s a Listing Lightning tool, which is we think it’s kind of untouchable when it comes to building optimized listings on Amazon quickly and easily.
[00:27:04] Augustas: Perfect. Let’s see what’s next?
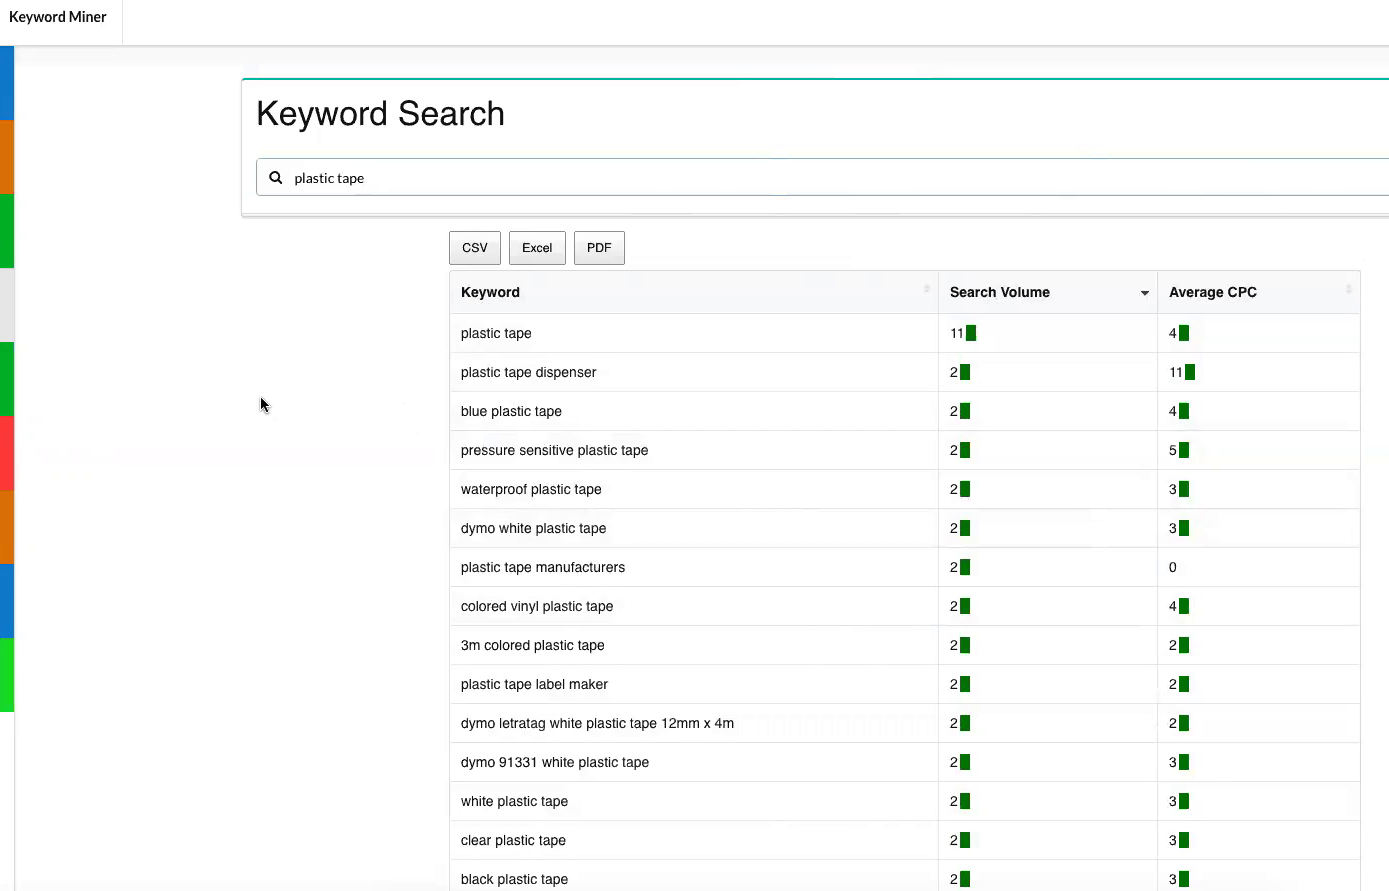
[00:27:07] Andy: Alright, what’s next is just a long tail keyword tool. I’m going to go too much into this just because, a lot of people are familiar with this. You could literally just type in a phrase, and you’ll see here, once again, we’re pulling a bunch of data, it’s pretty quick there. And so we got all our results here. We can export to CSV, Excel or PDF, that’s one of our keyword tools. We actually have multiple keyword tools right now. In the near future, we’re going to try to combine them just to make it a little more seamless so you don’t have to use a different keyword tools.
[00:27:48] Augustas: Could you explain what are these green bars, and the numbers next to the green mean?
[00:27:53] Andy: Right, one is search volume, so the search volume of other keywords, and then this would be like the cost per click for advertising, but since we just actually updated our keyword tools, and we’re going to actually roll that out into this tool as well. So this tool is going to actually get updated probably within the next two weeks to some of our newer tools.
[00:28:20] Augustas: So this tool will disappear or will the interface be upgraded ?
[00:28:28] Andy: It will disappear, and it’ll be replaced with a newer version. I mean it’s not going to go away. We kind of started from scratch on this, and we are replacing it because we wanted to make something a little bit more powerful.
[00:28:42] Augustas: And in the new tool, the search volume will be displayed in the similar way. For me, it’s not clear what means 2, and what means 11 .
[00:28:51] Andy: Yes, that’s one of the things we’re going to change. We’re going to change the search volume and some of the other data here. That’s kind of why we’re already doing it because we just don’t feel that this is super clear. So that is a part of the things that we’re redoing.
[00:29:04] Augustas: Yes, makes Sense.
[00:29:06] Andy: The next thing we’re going to do is an Index Checker, once again, I’m going to pull our real plastic tape. This is one of our other tools, but I’m going to pull the ASIN from there, just so we can show you how this works. And so we put in the ASIN, this one actually works for multiple marketplaces, so this one tool actually will pull from the different marketplaces. We will be rolling these out to some of the other tools here soon.
[00:29:30] Andy: Anyway, so we’re going to go ahead, and we’re going to check to see if we are indexed, and we want to do plastic tape, and let’s say roll, and let’s see. So go ahead and hit check now. Now, there’s been a lot of debate lately about whether the way that people are checking the ASIN, the technique that a lot of people were using in the past was the ASIN plus keyword for Amazon search. We’ve actually never done it that way. We actually utilized some APIs to do the search. So our search actually takes a lot longer than some of the other tools, but that’s because we’re actually checking in real time, and we’re using a different way of checking these keywords.

[00:30:19] Andy: So let’s do something else here. Let’s try a cup. Let’s add cup just to make sure and see if we’re indexed for that. Let’s go ahead and do a search again here, and we should be able to see that. So we can see here that we’re doing plastic tape. So we added the word Cup or saying we’re index for plastic tape and roll but not cup, which makes sense because we’re not selling a product that has a competent. So that would make complete sense. Now the other thing you do too is you can check by keyword or phrase. So plastic tape. Here’s the word plastic and the word tape are being checked separately. If you wanted to do a phrase to see if the word plastic tape as a phrase is matched, we can go ahead and do that. And you can see quickly that we are indexed for plastic tape, and that is how you can check to see if you’re indexed, and if you don’t know why that’s important, if you’re not indexed for specific keywords, so say, if you were selling plastic tape, and that’s like one of your main keywords or whatever list of keywords that you paste in here to check, if you’re not a indexing for those words, that means that Amazon doesn’t think that your listing is relevant for those key words.
[00:31:31] Andy: And so that’s when you would want to make some modifications to your listing. Now, if you’re using our Listing Lightning tool, the chances of Amazon not indexing you for the important phrases is almost zero, because we’re kind of building the relevance for you when you build a listing with listing lighting. So that’s the other really cool thing about Listing Lightning, so that’s Index Checker.
[00:31:57] Augustas: So one question about the bottom table, it says row 1. What does it mean?
[00:32:05] Andy: We have different rows here. So as you can see here, it’s row 1 here, row 2 and row 3. So if you want to paste an entire bullet point so you could copy like bullet point one and paste it here.
[00:32:21] Andy: Bullet point 2, 3, 4, things like that. This is just a separate, maybe row 2, which is your second bullet point is getting really poor indexing results. It’s just so you can kind of separate the data, if you wanted to do your title here, and your first bullet point here, it’s just to separate the data so that you have an easier time to digest and troubleshoot and kind of figure out, why maybe your title’s not indexing well, or your first bullet point.
[00:32:46] Augustas: So the row column tells me from which row field it took the keyword, right?
[00:32:55] Andy: Correct. Now you could just paste all your keywords into row one and be done with it. But then then it would be a harder time to go back through, and look and see, if you have this all in a row, it’s going to be much harder to figure out where that keyword is and at what section of your listing, that you need to work on.
[00:33:15] Augustas: So could we write in row 1, Plastic tape, and in the second row, Strong, to see what happens and in the third row, we write Mother, and see what happens.
[00:33:25] Andy: Yes, sure. Plastic tape in row 1.
[00:33:45] Augustas: And strong in row 2.
[00:33:46] Andy: Okay, so you can see Plastic tape in row 1, and Strong in row 2, and Cup falls in row 3. So that’s how you can kind of separate it, so you know where to look, this way like I said, if you paste it, all of these huge list of keywords in row 1, then it might be hard to kind of go back through and diagnose, why that keyword isn’t indexing. It’s just kind of separates the data, makes it a little easier to digest. All right, the next tool is Rank Rocket. Now a lot of people are familiar with this type of tool, it’s a keyword rank checker. And then it also tracks your BSR, your best seller rank, and also your price. And you can see here if you’re trending up or down, this is for the last, I believe it’s last 30 days.
[00:34:38] Andy: Let’s see where we’re starting and ending. So it’s the last 30 days I believe. So you can see here that we’re trending sideways. So it just means that the overall rank between this last period, It means that, when you average that out, we’re averaging a rank of 13 here on this one. You can see, we’re climbing. You can see here that they’ve got a huge jump here, which it’s an Amazon brand. So looks like they’re giving themselves a little bit of a big boost here, and then also tells you how many keywords are indexed. So this is saying you we’re tracking 4 keywords out of 4 keywords. We’re ranked for all of them.
[00:35:23] Andy: So we can go ahead and click into that, and get a little bit more detail in here. You can actually hover over and see from day to day, like where are your tracks, you could say packing tape dispenser, day to day at 34, 30, here it looks like we’re tracked for packing tape dispenser just for a couple of days. They were indexing just for a couple of days here. You can see that, and you can also see down here that we got our BSR. So BSR is 431 here. We’re climbing up to one 167. So this is just very important. A lot of people, either don’t use rank tracking or kind of don’t know why you want to use it, and the reason you want to use this as if you’re running any type of marketing.

[00:36:08] Andy: So, if you watched my queue for seller summit session, I kind of mentioned why you want to track keywords. So if you say for example, you were tracking or sending off site traffic to a packing tape with dispenser as one of your keywords. You want to see, in this case, it’s going down. If you’re using off site traffic, most likely you’d see the opposite, you’d see it climbing. But that’s why you want to use tools like this, is you want to be able to gauge how your marketing, and how your listing optimization and things like that are working for you. So that’s why you want to make sure you track this data. You can also go ahead and change the range here. So if you’ve been tracking this product for 90 days, 60 days, 30 days, you can go ahead and adjust this range here.[00:36:55] Andy: The other cool thing that we do that I’m not sure too many others do is we actually give you the ability to do a start and end date. You can actually download this data into an excel file. So if you want to do some more extra number crunching or you know that like you ran some kind of special promotion from 5.2 to 5.12, you could actually download this and compare it to some offline data or some different data, but you could actually download this data, which is pretty cool.
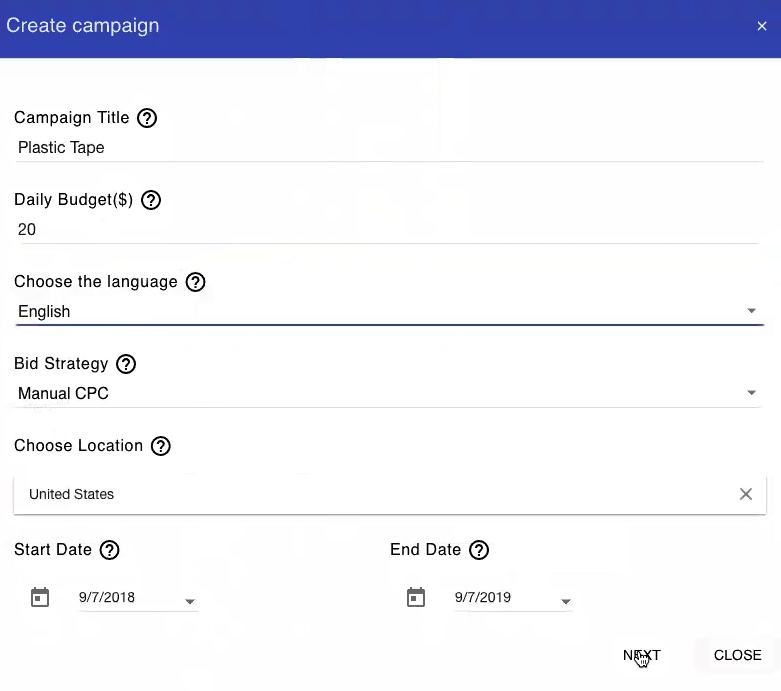
[00:37:28] Andy: Let’s check this one out, just for fun here. So we can see here we got Red Cup, Red Cup, Red Cup 45, 43 and then bang, they made a huge jump to, looks like 10 here or so. It looks like they got some good juice there, but it’s an Amazon brand. So that’s our Rank Rocket to track your keyword ranks on Amazon. Alright, the next tool is the PBC dominator tool. Now, I don’t know if you remember, but previously when we used the Listing Lightening tool, we went and transferred keywords into this list here, so that’s what we got here. We got all these keywords already ready to go. So how we fill this out is actually pretty easy. We would just do, let’s see, Plastic tape. Maybe I should have you time this, daily budget $50, we want to start today, we don’t want an end date. The reason you’d want an end date is say you’re running like a Valentine’s Day promotion, and you want it to run for a week, then you would add an end date. But generally, you don’t want that targeting, we’re going to do a manual campaign bid plus, and once again these have some highlight points, where you can mouse over and I’ll tell you what it is, plus we’re going to have disabled status paused, that’s if you want to upload this campaign and look at it before it starts, which if you’re kind of new at using this tool, it might be a good idea, but I know exactly how it’s used. So I’m to set that to enabled. And then I’m going to go at group 1 for my ad group name, my max bid.
[00:38:56] Andy: I’m going to set it at $0.99, my skew, which would be your product skew, so you can do one or multiple depending on what you’re targeting here. We’re just going to do plastic tape, and we’re going to come down here. Now we already have our keywords, if you wanted to, you can, you can add extra keywords. So you could do duct tape or a bulk tape or anything you wanted to do to add. You can actually search keywords here and then add them one at a time or bulk add them, so for example, want to do Plastic Cup again or no, we were doing packing tape. Let’s do packing tape again. So if you would do packing tape, I’m just using this as an example, even though we already have the keywords here, so it wouldn’t really matter. So once again you can see here, we can add specific keywords by clicking on one and hitting add or we can add all, and then it would add to this list, so you can continue to build more and more keywords out into this.
[00:39:49] Andy: This tool works great for just building a general manual campaign. But the other cool thing about this, is part of the reason I built this, is just so you could do super long tail campaigns. You can technically paste 20,000 keywords in here, and this will build you an Amazon campaign with 20,000 keywords and like I said, within a minute or two, I don’t know of any other tool that can do that, so that’s kind of really neat. So we go down here and then the other really neat thing about this, generally when you build a campaign, you have to build each a separate ad group with match types, at least that’s best practice. So you’d have to build a broad match ad group, a phrase match ad group, and an exact match ad group, and then you also would have to go in and set all those bids separately and things like that.
[00:40:39] Andy: So the cool thing about this, is you can go ahead and add match types right into this, this creation portion. So right here, I’m going to do all three of them. I’m going to do broad phrase and exact, and you can also separate the bids, which is also awesome. Generally broad, you know you’re going to have a lower bid. So I’m going to do $0.20 for Broad, Phrase I’m going to do $0.77, Exact I’m going to do a $1.11, just to kind of show you how this works. Alright, so we got this campaign built, we’ve got our keywords, we get our skew, all you hit is ad data and there you can see it’s ad data. You can see up here we have 998 rows in excel. Now we can continue to edit this or we can add more to the sheet before we download it.

[00:41:22] Andy: Now once we’re done, we just click on download. And what that does is that it downloads an excel sheet. And what that excel sheet will do is you go to your advertising dashboard, and there’s a section called bulk, I think it’s called bulk uploads. And what you do is literally click on the button to bulk upload, and then you, looks like I’ve locked my own. All right, you want to allow that pop up so that you get the file downloaded. So anyway, you get the file download here and then you go to Amazon, and you would actually upload this file to Amazon, and it will build this campaign in the background. Now sometimes it can take awhile because it’s such a big campaign, it’s going to take awhile to build that. So no more than like 5 minutes, but once that’s done, then you can actually go on to Amazon seller central, and you can pull this campaign up and see all the different parts that were built.
[00:42:18] Andy: If you were doing this manually, of course this would take you hours, so it’s a huge time saver and the fact that you could build these campaigns now in a matter of minutes. Not only that, but you’re not having to do any keyword research because we’re already giving you all the keywords and also your PVC, is going to be very relevant because all these key words are already going to be in your listing. So Amazon’s going to see these keywords as ultra irrelevant. So you can go through and continue to add extra campaign. So if you wanted to build multiple campaigns, you literally just do the same process, hit add data, and you’ll see the rows in excel will change. And you can do that over and over again, and build multiple campaigns. So people who have been doing this manually, will absolutely love this tool because it completely automates this process, and let you do tens of thousands of keywords.
[00:43:07] Andy: On Amazon, if you try to do this, you can only do a thousand keywords at a time. So you literally have to create an ad group, paste a 1,000 keywords, set the bids, save it. There’s just so many different steps, and not only that, but you have to separate each match type. So if you wanted to do a broad thing, you would have to do like in this case, we have tons and tons of keywords, if you maxed out on a thousand, you’d have to do a broad campaign to do one set of keywords than you would have to do another campaign, I mean another ad group to do the phrase match, then the exact match. And they would max out at a thousand and you’d have to go back and do them all over again.
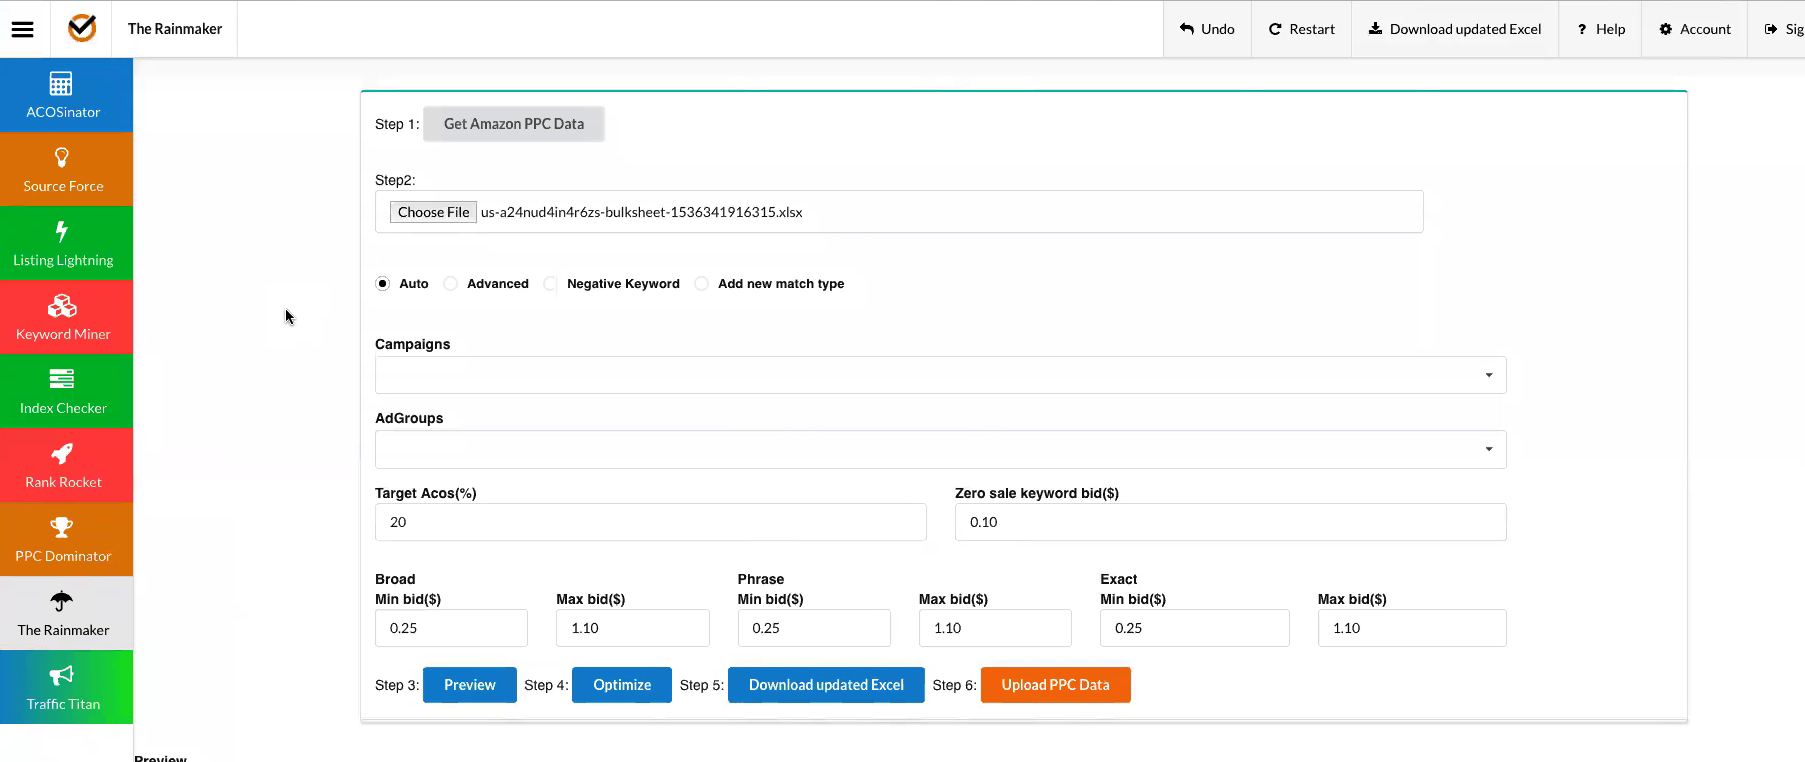
[00:43:49] Andy: So this really saves tons of time, and that’s PPC dominator. And the next tool I’m going to show you is the Rainmaker, which kind of goes really well with the PPC dominator. And it’s kind of steps you go through, which is nice. So the first thing you’re going to do is click here and get Amazon PPC data, that’ll take you to the bulk download page, on your Amazon account, and that will let you select the file, select the range. So you’d want to do 60 days to get the most amount of data for your keywords. Now a lot of people are saying, why don’t you connect to the API, so a lot of people connect to the API, and we’re not opposed to that. We’re actually on the fence now, our tool actually were in the process of connecting to the API as well.
[00:44:33] Andy: And then we’ll give the user kind of choice if they want to connect to the API or not, but kind of the reason we did this is, we’ve seen in the past, some Amazon software, mine a customer’s data, mine seller data, and then sell that data to third parties, and we just as sellers ourselves, we kind of got a super sour taste in our mouth over that. So in the beginning we decided that we’re just going to make it to only keep your data while we make the changes. And then once it’s done, we delete that data and we don’t keep it, we don’t mine it, we’re not selling it to anybody. And this data is your data. So we’re going to allow you to keep it, and still get the same kind of benefit as all the other tools.
[00:45:21] Andy: So you download your excel file from Amazon. You’d upload it here. We got one uploaded now. And so this is kind of magic stuff right here. So the first thing that we do is if you’re kind of new to Amazon and you’re saying, Hey my ACOS is at a 60, I really need it at 20, I don’t know what to do, I don’t know how to. I’m losing so much money on PBC. It’s one of the main, or one of the things I see an Amazon seller groups on Facebook all the time is people are kind of losing money on their PBC, and they’re ACOS is super high, and they just don’t know what to do. So this is what’s cool, we actually kind of have it set up for you here. So we got a couple of different options here.
[00:45:58] Andy: We’ve got targeted ACOS, so this would be what you’re shooting for in terms of where you want your targeted ACOS to be. In this case it’s 20%, which would be in our case a very good profit margin. But of course you would edit that to whatever your goal is. Now, zero civil keyword bid , a lot of people do negative match, for me what I’ve noticed is negative match can make you miss out on opportunities, if you get rid of a keyword that has made any sales in the past, then you could actually be hurting yourself. So this is a zero sale keyword bid. So this is saying I’m going to keep that keyword that has performed in the past, but has a super high ACOS or in this current period of time has not made any sales.
[00:46:50] Andy: So in this case you can do $0.10, is what we have preset, but you can make it down to $0.06, so we can do that and then we want to go back through and do some changes here. So we separated broad phrase and exact with minimum and maximum bids because, like I said before, like we know generally that’s the case. So you can go ahead and set your minimum bid, and your maximum bid for each type of match. So here we have a broad match, a minimum match, a minimum bid and a maximum bid. And what that does is it makes sure that you don’t bid below that amount or above that amount. So it’s kind of a safety net. So if our algorithm goes out and makes a large change, it’s going to make sure that it doesn’t Max out because sometimes the data can be a little bit misleading in this, it’s just kind of a lasso for our algorithm to make sure that we’re not going to bed like $10 on a keyword.
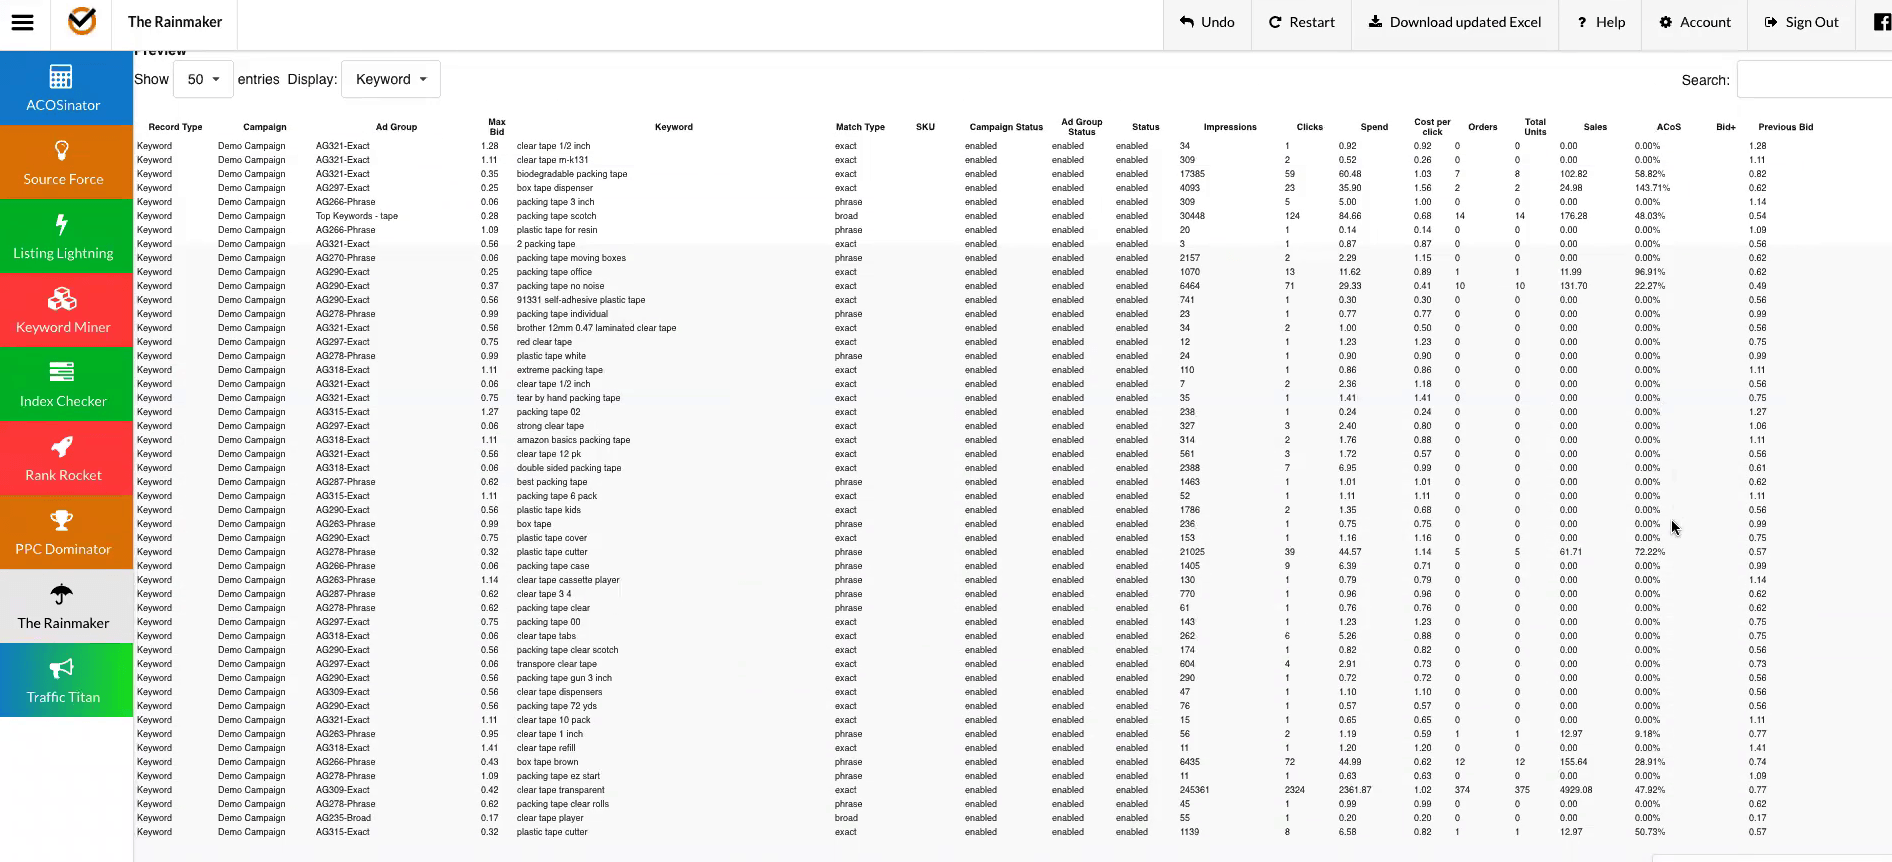
[00:47:44] Andy: So we’re going to leave it just the way it is. So we’re going to say a phrase. We’re going to do 0.25, 1.10, 0.25, 1:10 all across the board. Now the next thing we want to do is we’ll hit the preview button. What this is going to do, is this going to go through now and it’s going to show us what changes we’re going to make here, and we’re just going to filter by keyword because that’s all we want to see at this point. Let’s see here. So we wanted 20%. You can see the ACOS here is 58%, our previous bid was $0.82 and now we are down to $0.35. So we’ve automatically changed the bid on this keywords, and make sure that you’re going to get close or try to target this 20% ACOS.
[00:48:30] Andy: And this is all done by algorithm. Now, now you can see that, we’ve got 775 entries. Now, if you were to go in and edit this, even with Amazon’s own tools, to go through and edit each one of these, and even some of the most popular PBC tools out there right now, you literally have to go through on each one and filter it, and find out which keywords are performing, which ones aren’t performing, and then filter them and then change them, and do all those kinds of things. So this is literally a couple of clicks, and in this case, I am not filtering by campaigns or ad groups. So this would optimize my entire PBC account in a matter of like a minute. Now you can go back if you have multiple campaigns and filters.
[00:49:14] Andy: So you can say, I just want to do 20% on this campaign. I want to do 30% on another campaign. So you can go through and filter in, and only select specific campaigns and then target that by ACOS, and do this process for the multiple campaigns. Now once you’ve got that, then you had optimized the preview so that you can go through and kind of verify the data. This is kind of check and balance, so you can go through and check the data, and make this a little bit bigger so you can go through and see and make sure that the changes look like they are going to b a good change for you, a plastic tape cutter, it looks like we’re at 72%, and then now we’re down to 32%.
[00:49:55] Andy: So yeah, these all look good to me. It looks like my keywords that are being overspends on, are getting adjusted down. So that’s perfect, so once we do that, we did optimize. What that does is it actually makes the changes now, and then we go download updated excel file. And then once again, you would go to your bulk upload in yournseller central account, and you would upload this file. And like I said, generally depending on your account size for us, I think we’re up to about a million keywords, so for us when we upload this file, it takes like 10 minutes for it to crunch through because it’s got so much data, but generally I would say probably 90% of Amazon sellers who have 5 to 10 campaigns, maybe 10,000 keywords it would be extremely quick.
[00:50:46] Andy: And so once you upload that to Amazon, it actually makes all the changes for you, and then you’ll start seeing results within a day, you’ll start seeing results with your ACOS coming down. So that’s just one of the multiple ways to use this tool. The other way that you can use this tool, let’s restart and get our data cleared so that we can start over. We’re going to restart it with our data here. And what that’s going to do is that it’s just going to reset all the changes, so you can see here we’re back to where we started and that’s going to make sure that our previous changes aren’t going to affect what we’re doing now. Now, if you’re an experienced seller, and so this would be more some of the other tools out there.
[00:51:31] Andy: And Amazon has this kind of filtering as well, but no way to do changes in bulk like we do, once again, we’ve taken what other tools have done in the past and kind of made it a lot better in the fact that you’re going to save a ton of time doing this. So how this tool would work is if you’ve got some experience in Amazon, you want to see what products are performing really well, we can start putting in some filters. So we’d want ACOS between 1 and 10, and we want to see keywords that have had at least two sales. And we want to check all the different types of match types for this criteria. So we’d set the criteria, we’d hit apply filter.
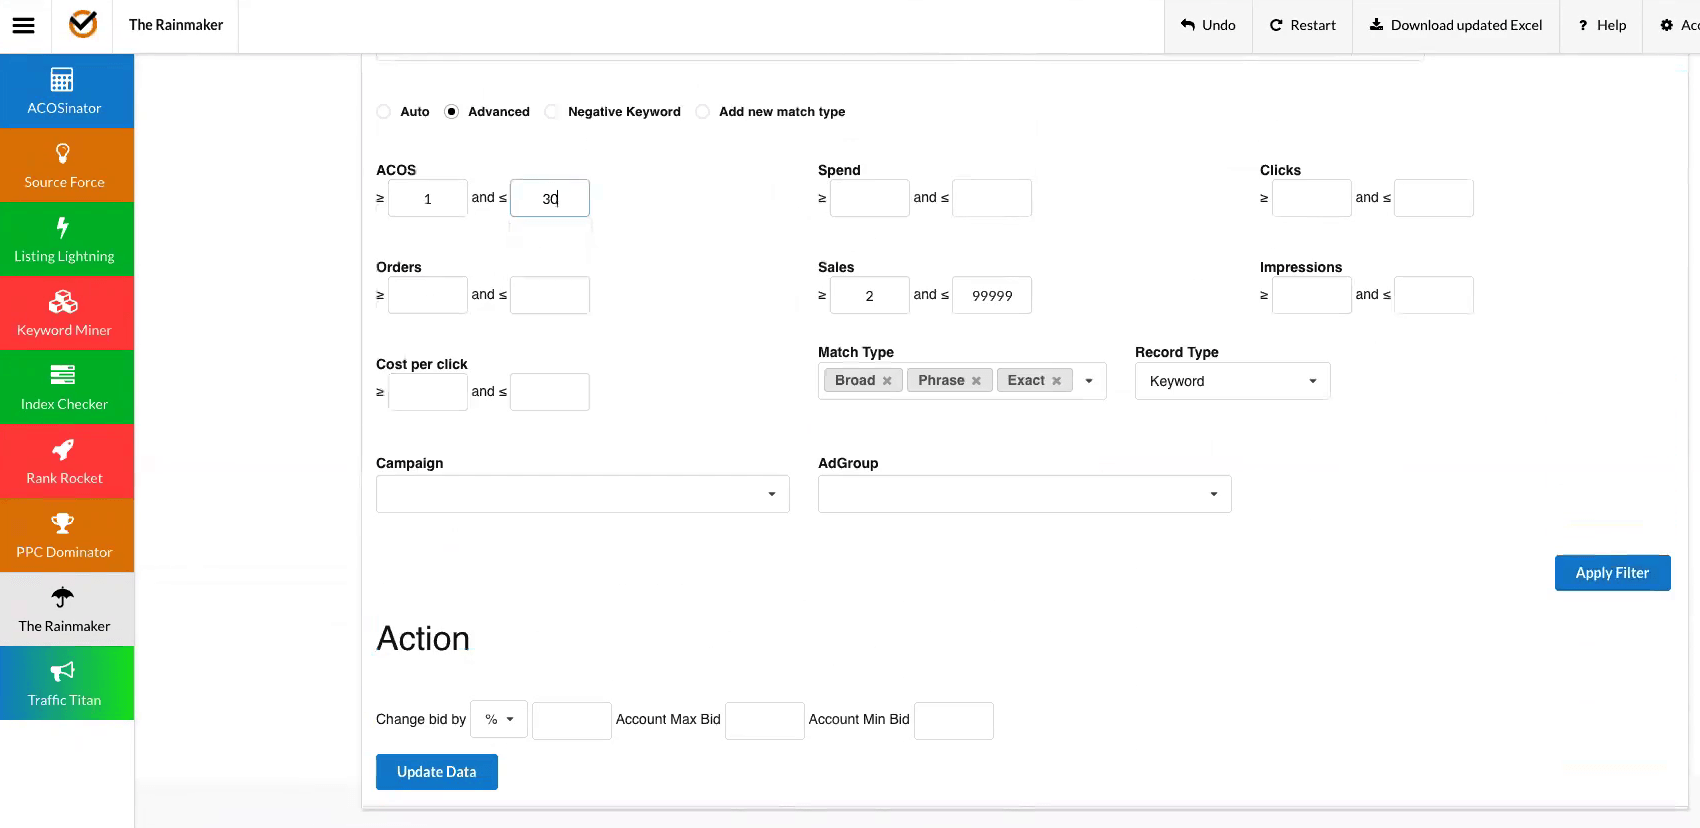
[00:52:15] Andy: And what that’s going to do is in couple of seconds here hopefully, I guess I don’t have any super lower ACOS on this amount of data. I’m used to having my entire account. I just use the demo campaign here. Let’s try 30%. There we go. So we’ve filtered and we said we want any keywords that are between 1 and 30%, and so now we’ve got these here. Now what’s cool here is once again we can see, this one’s 22, this is 28, this is 25. We we’re performing, say our target a ACOS was like 35%. So in this case we’re probably going to want to raise the bids on these a little bit to see if we get some more sales, and some more attractions, more visibility. Now, if you’re trying to just make profit, of course, this might be right where you want to stay.
[00:53:06] Andy: So what we can do here is we can say, all right, we got these three keywords, let’s change our bid, let’s make them all raised by 10%. We can also, once again do a Max bid, a minimum bid, just to make sure that we don’t make any changes that we don’t want to, generally work with a much bigger list in your account, but I’m just doing a small demo campaign here, and then you’d go ahead and hit data. Now what that’ll do is that it will adjust your max bid up by 10%. So you can see here that we’re now at a higher bid or we’re now at a bid slightly above what our current cost per click is. And so now we are going to hopefully see a little bit more sales and attraction. Now we can also use this kind of the opposite way, which is really nice, we can say like we want to show anything that’s at a 60 or above ACOS, and we want to make sure that we’ve got two sales on it. Let’s go ahead and try that, and we’ll filter that through. And so we got a bunch of keywords here. Maybe if we do sales at one, we’ll get some more results here.
[00:54:21] Andy: So we’ve got 5 entries. All right, so once again in this would be like I’m editing just like a single campaign. Once again, you can do that here. You can single out campaigns or you can adjust your entire account at once, which is really sweet. So we’ve got our keywords here. Generally you probably wouldn’t want to use a large level, generally you want to do a smaller level, like 60 to 70 because then you can make a little bit more fine tune adjustments. But say our max bid is 143 or Max ACOS is 143, and our minimum is 62 and, say I want to half that, I want to try to drop that ACOS down to like 30, 33% or something like that.
[00:55:07] Andy: So what we do is we just hit in minus 50%, once again, we got a maximum and a minimum bid. We had update data and once again we’ve automatically adjusted those bids now, so these keywords have been adjusted to make sure that we are going to try to hit our target ACOS, and once again you can use this to reduce costs, to change your bids, and also to make sure that you’re getting to a point where you’re profitable. And that’s the advanced tab for the Rainmaker tool. All right, then we got a couple of other quick ones here. I’ll just explain this one really quick. The negative keyword would be if you want to go in and add negative keywords, like I said, I don’t recommend that, to me it’s better to filter, and then just reduce bids by keywords or by ACOS or by bid or whatever criteria that you’re using.
[00:56:07] Andy: Use your advanced filtering to reduce the bids on keywords that are not performing rather than negative match them. The other cool feature here, is we can add a new match types. So say for example, let’s look and see if we got any broad keywords. See anything that’s selling, let’s do this, so we’ve got a couple of keywords here where saying, show me any broad keyword that has a sale. Let’s do an ACOS filter. You probably wouldn’t want to do this, normally because this ACOS is higher than most people would want, but I’m just going to do this for demonstration purposes. So say you wanted all broad keywords with an ACOS between 40 and 80 that have had at least one sale.
[00:56:58] Andy: What’s cool about this is when you go now and say, we have brought this keyword and broad, but we also want to test it in a phrase or exact. Now if you built the campaign using a PVC dominator, you’ve already got that setup, so you wouldn’t need to do this. This will generally be if you’ve already got existing campaigns, and so that you could take an ad these without having to go through and manually do it. So I can say I want to add phrase and exact sooner, add a phrase and exact match for these broad keywords. So packing tape, scotch and packing tape lightweight, we’re going to now add those in a new ad group with a phrase match and an exact match. And because this is broad and generally, we get a better ACOS for phrase and exact.
[00:57:44] Andy: Say we want to raise the current bid for broad by 10%. And the bid for exact by say 30%. Now what we do there is we go ahead and hit update data once again, and now what that will do is that would add these keywords into a new campaign. You would hit download, updated excel. And what that’ll do is that’ll download these new keywords. And then when you upload them to Amazon using the same process I mentioned before, that will automatically add those, in this case, phrase and exact matches to your Amazon account using this process. So that’s pretty neat. Generally people have to go in and manually find the words that are converting and then add those match types.
[00:58:34] Andy: And the last tool we’re going to show you, which is our newest tool and is in data. So you can see here, there are tools that you use at your own risk. A little flag here. So we’re going to get rid of that. Traffic Titan tool automates the process of sending your Amazon listings traffic from Amazon using two-step urls. So targeted keywords, the first thing that we’re going to do a search on some keywords that we want to drive traffic from. So for example, we were using plastic tape or packing tape before. Let’s go and use that again to do packing tape. We’ll go ahead and do a search and this will give us some keywords. Now this interface connects to the Google Advertising Api. So we’re actually in this case, we’re pulling keywords from Google because that’s where we’re targeting for off site traffic.

[00:59:25] Andy: The other thing you want to look at here, as you can see suggested bid on a lot of these is pretty high. So maybe we only want to target keywords that cost us a $1 or less, so we can go ahead and filter that. And you can see here we’ve got only keywords now that are less than a $1. So let’s go ahead and do that. So the other thing we could do is you could add a cured individually by clicking here. It’ll show up in your keyword plan or you can go ahead and bulk select them and then hit add. Now, once you do that, you’ll come up here, you got your keyword plan, and these are the keywords that people are going to be searching on Google in order to find your ad on Google, to click on that sends to your two step url that then goes to Amazon to get you a sale. And hopefully a conversion in a sale, we’ve got the keywords added. We’re going to hit continue. Now, once we get here, we’re going to do campaign title. Now, let’s do a plastic tape.
[01:00:26] Andy: Set a budget of $20 a day. This stuff should be preset for you unless you’re in a different country or targeting a different area. We’re going to do English, all this stuff you leave the same unless you want an end date, currently it’s set for a year. We’re going to go through and step through that ad group. You can call it anything you want. Just going to do ad group one default bid. We were trying to stay below a $1, so let’s do $0.99 cents as our bid. We got our keyword ideas in here, so we’re gonna hit save and continue again. And then this is really cool, this is what makes this tool kind of awesome, and saves so much time, and even if you don’t know how to drive traffic from offsite, you can use this process.
[01:01:09] Andy: So let’s go ahead and do this. Let’s do a two step storefront url, so we’ve got our storefront url, our storefront ID, and this is how you can find this is by clicking on your brand name, and then when your brand page loads, you’ll see seller equals, and that’s your store for an ID. You had plugged that in there, keywords once again we kind of make this super easy for you, and make it kind of awesome. Now what’s cool about this tool on keyword suggestions is we can actually get some keyword suggestions directly from Amazon data. So we’re going to go on and put in packing tape. We’re going to get click, get suggestions and here we go. We’ve got a nice list of packing tape. If anything in here doesn’t look like something that is relevant for our product, we may want to get rid of it or if we’re just trying to maybe target a single, one or two key words, whatever you’re doing, here is where you put in, comma separated, ASIN, we want to use whatever ASIN is, just make one up here.
[01:02:23] Andy: So you put your ASIN in there, and then your minimum and maximum price, this is to filter if you have multiple variations, you can put that in. So we’ll say in this case, our packing tape costs 9.99 through 11.99, and now once we do that, we hit generate. You can see here, now we’ve got a bunch of two step urls. Now what’s going to happen here is we’ve got our list of 10 because we use 10 keywords, so you can see here we got packing tape, we got packing tape rolls, we got a packing tape with dispensers, so you can see these are all separated by commas as well. And these are all two step urls that we just generated. Now of course you can put any type different type of url in here if you want, but you can see here if you click on create two-step urls, we got the three different main types, the storefront, the brand, and then the add to cart url. And the process is all the same. The only difference is the add to cart url, doesn’t create keywords, so we got that. And now this is the ad that we’re going to have to appear on Google. So when somebody searches on Google, this is going to be the ad that they see. So let’s do that. Try our awesome packing tape. You will love how sticky it is. And same thing for the description.
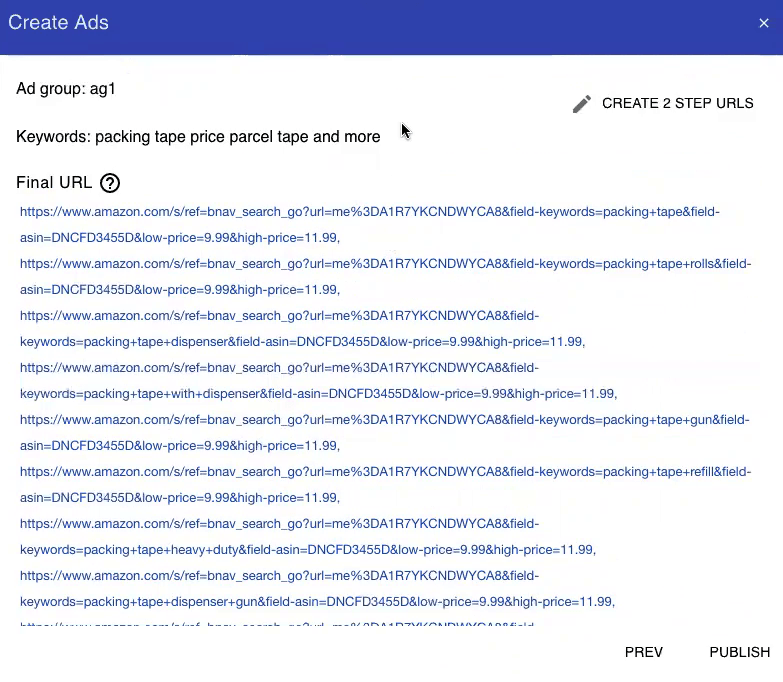
[01:03:59] Andy: We’ll combine the two, try our awesome packing tape. You will love how sticky it is. Buy one today. So that would be our headline, and our first headline part, and then our description. Now the other cool thing is, here that we’ve done this, it’s literally 1 click, we hit publish and we’re done, now that’s going to go out through the Google Api and publish that to our google accounts. And then it will start driving. You can see here, congratulations published with Adgroup. So that tells us that it’s been successfully published to Google adwords. So now we’ve got our two step urls and our offsite traffic campaign built for us, what did that take me, like two minutes? So you can see that if you were to do this process manually, you’re talking upwards of probably 30 minutes or more.
[01:04:59] Andy: So it’s a huge time saver, not only that, but you’ve got a keyword filtering and a keyword ideas, you got the two step urls that are built automatically, so this is great, especially if you are new and don’t know anything about, driving outside traffic or creating two-step urls. You can get the benefit of driving outside traffic, extremely quickly and easily with our traffic type tool. And I’m going to give you one last quick demo. It’s our new keyword tool for chrome. So I’m going to hop over that real quick and then we’ll go ahead and jump into the keyword tool, this is a new version. It’s not quite out yet. A previous versions, a little different. This one is going to have a lot more features and as you can see here, we’re starting to work on adding a different countries.
[01:05:52] Andy: This is an entire list. We don’t have all of these countries because Amazon doesn’t sell all of these, but like United Kingdom and Germany and things like that work currently. So this version should be out hopefully in the next year, we’re just kind of putting the final touches on it, you can get the current version now though, and it’ll automatically update to this version if you want to, it’ll automatically update to this version when we push it out. So no need to worry about that, so keywords, we’re using plastic tape. So what you’d want to do here is, let’s do packing tape, plastic tape, and box tape. So you’d want to do here is these are the seed keyword. So these are kind of the keywords that you would be starting out with, when you’re going to be doing the search for these keywords.
[01:06:42] Andy: So we got one in each line, all three looks pretty good. So what we do next is there’s a couple of different things you can do. You can get served volume. So if you pull keywords from, say a different tool or somewhere else, you could paste those in your keywords and then just get the search volume for them. Or you can get suggestions, get related keywords and search volume. So we’re going to go ahead and do that because we will want to get suggestions, and we want the volume for that. Now we’re pulling this data directly from Amazon. So you can see here it’s taken a little bit. Now the larger this list is, the longer this is going to take because we’re actually pulling real time data, so you can see here, we’re about 50% done, but what you’re going to get when you see in the results are what a lot of different mainstream seller tools are charging for right now, which is not only actual Amazon search terms, but the actual volume.
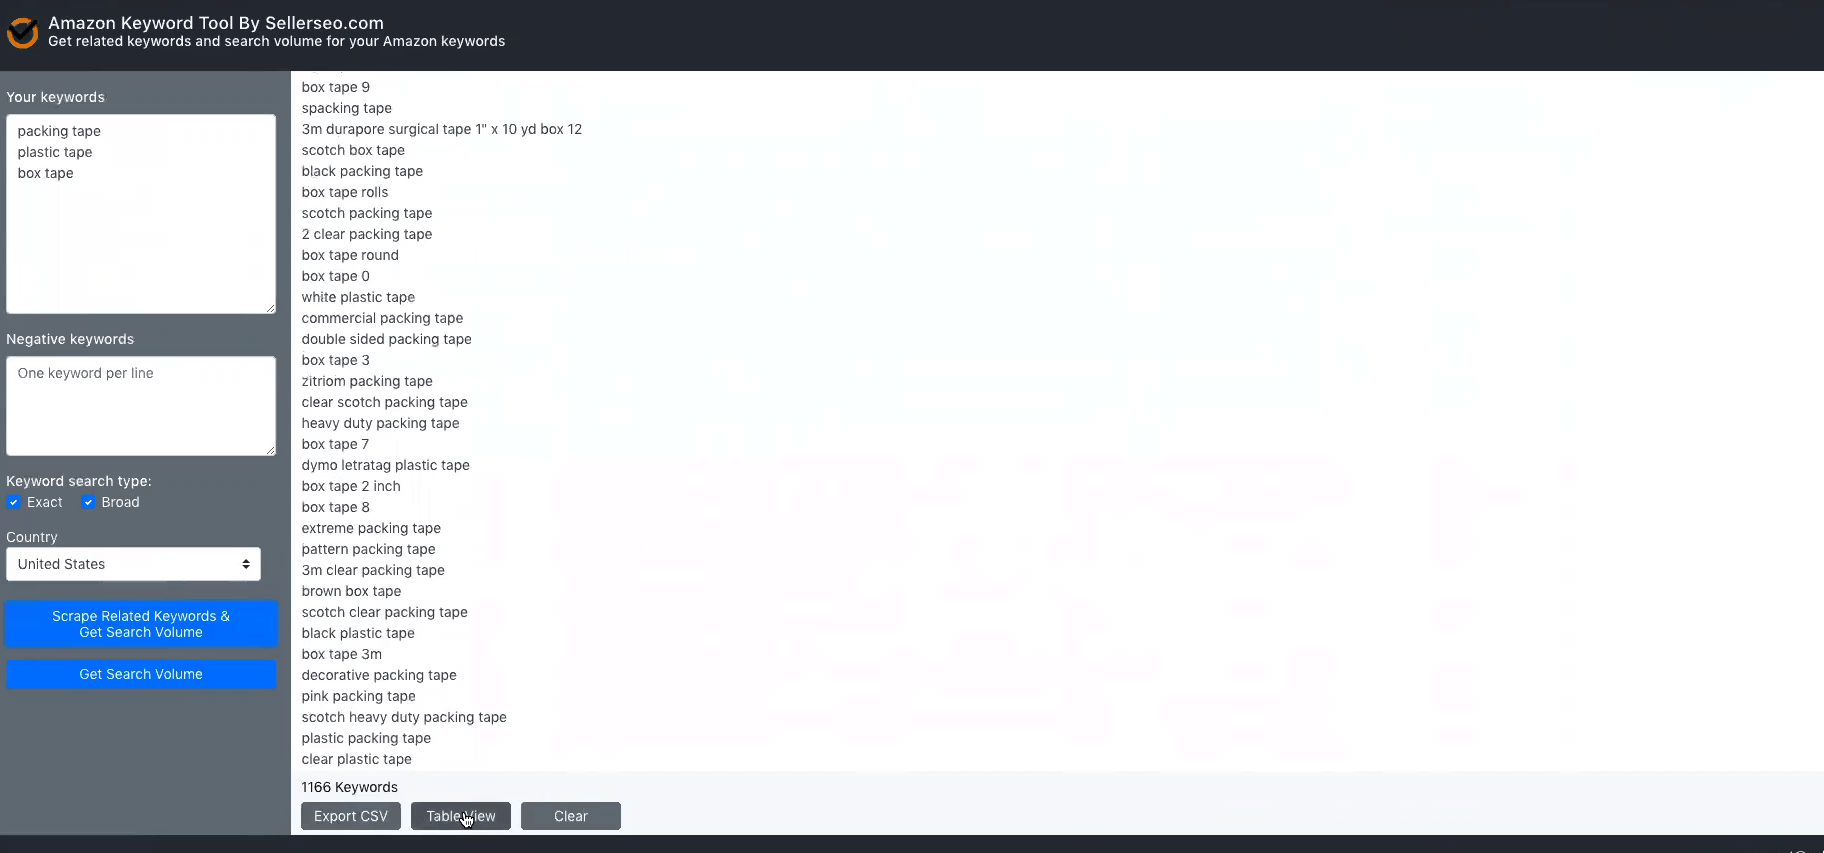
[01:07:33] Andy: So search volume data. So the data that actually tells you how many people are searching for it. So I’m actually in table view or in text view now, this is kind of cool. This is one of the features. So you can look at the results in text view. So if you wanted to just come here and copy and paste it somewhere really quickly, you can do that. Our table view, which will give you the match type and the volume, or also you can export to CSV. So right here we got a 1166 results, and you can see here we’re sorted by search volume, and we also have the different match types, you can see here, we can go all the way down from the most popular to the least popular. We can also edit rows.
[01:08:14] Andy: So we got 100 rows now, if we want it to 200, we can keep going and we got different pages here so we can page through and see all the difference, the different match or the different keywords and the different match types. And you can see they’re all pretty relevant, which is nice. So you’ve got packing tape easy, packing tape narrow, looks like some brand names in here. Packing tape labeler, packing tape, usps, so extremely useful, you can also click on the top of your course, and sort like if you want it alphabetical or anything like that, you want to sort by volume. So a cool tool. We also have some stuff planned for this tool, I don’t really want to talk about because I don’t want to give it away to our competitors, but we plan on making this keyword tool extremely powerful and keeping it free, and we may add a couple of paid options, we’re not sure yet, but the main kind of functionality.
[01:09:21] Andy: So what I just download here is going to be free for life. So you definitely are going to want to grab this. A lot of other Amazon tools will be charging you 50 bucks upward, to 100 bucks a month just for this single tool, so we’re excited about this because we’re wanting to make sure that sellers have access to this data for free, especially if they’re starting out. I know it’s super hard to be able to get this data, that’s our extension and you can find it on the chrome store. We’ll have it in the links and that way you’ll be able to click and download, and install it on your chrome browser and use it. And of course send us any feedback on this, however we can make it better, we’ll try to do that. So these are the core tools of a SellerSEO, and also our chrome extension, which is our keyword tool. Now, if you want this data and you don’t want volume, we do have one other tool. I guess this is kind of what I was mentioning before, we have a bunch of different keyword tools and we’re going to kind of combine them. So this is keywords.sellerseo.com, this tool is separate from the main tool, and this one’s also completely free, but what’s kind of cool here, you can do a search, so plastic tape, once again, this is real time Amazon data, so it has taken a while.
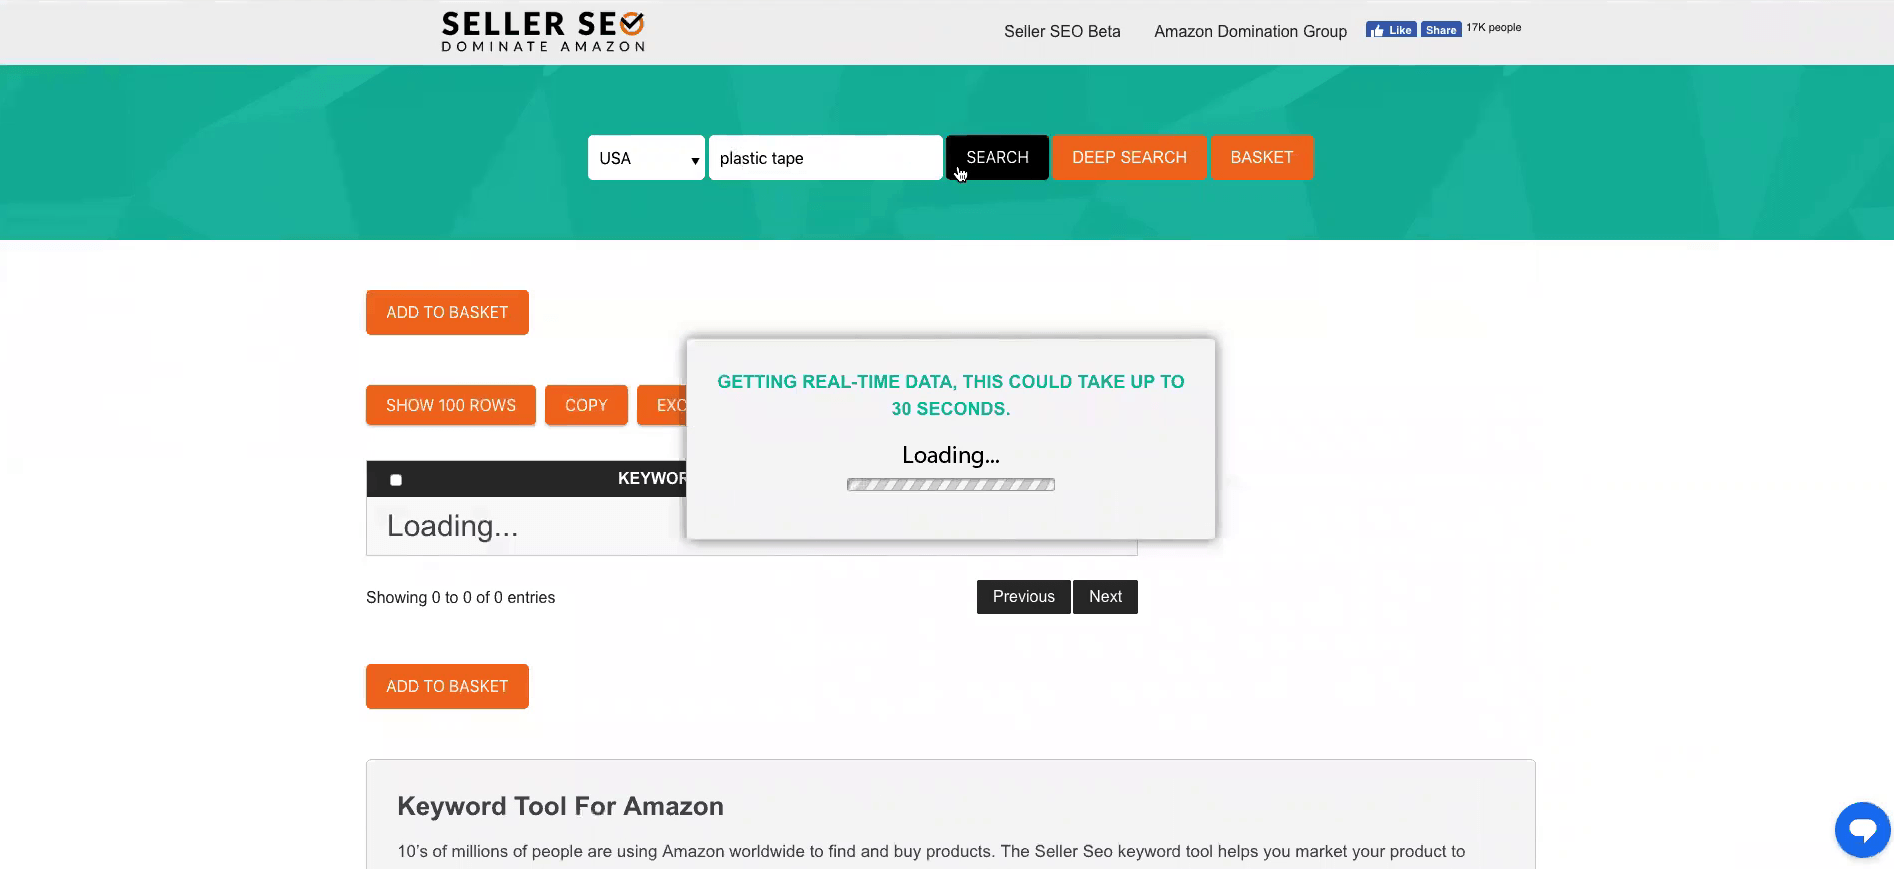
[01:10:57] Andy: So here we’ll get plastic tape, and we’ll get suggestions for plastic tape, the other cool thing is we also have a keyword basket, so that means that you can kind of cherry pick, when you search for different keywords. Let’s see, I want a piece plastic tape I want adhesive plastic tape, and I want clear plastic tape, and I want to add that. So it’s added to a basket, it’s Kind of like a shopping cart. So we added them successfully. Now we want to maybe try a different keyword, maybe we want packing tape like we mentioned before to get kind of a new set of keywords. So we go ahead and search that again. And once again we’re pulling real data. Literally, everyday we pull real data from this, and sometimes we pull it in real time, if it’s not currently pulled.
[01:11:47] Andy: So we usually refresh data daily. So because nobody’s searched this term yet, today we’re pulling the data completely fresh, if somebody comes in after me and does this, you’ll get the results instantly, because there’ll be on the same day. So we get real time results during the same day. Now what you’d want to do is once this finishes, then we can add more keywords. Now it’s taken a long time because we are probably going to get a ton of keywords. How many keywords we got here, 270. So we’ve got a ton of keywords, and once again we can cherry pick, so we can go. We add those to our basket, and you can see here that we got it. So now we can go to view basket and that’ll give you all the keywords that we went through and picked.
[01:12:34] Andy: And then you can copy directly exported via Excel, CSV, Pdf, things like that. So that’s pretty cool, the other really neat thing is we have, like I said, this deep search, if you do that, we search even deeper, but it takes about 30 minutes because we’re literally going to find every keyword related to that search term that we can get from Amazon, and so we have to crunch through that data, so you go ahead and enter a keyword, so plastic tape, then you’d hit deep search, and then you’d enter your email address and then we deliver the results to you in a CSV file. So that’s kind of really neat too. And I think that’s all I wanted to show you today.
[01:13:18] Augustas: Allright, great. Can we talk about the pricing ?
[01:13:24] Andy: For our pricing, we have three levels. We have as you can see here, Starter, Advanced and Elite, with the starter you get the free tools, so the ACOSinator and the source force tool, and then you also get on top of that the listing lightening tool, which is the listing building tool. And then the keyword tool, which is the keyword minor, like I said, we’re going to be updating of that tool shortly. So that’s what going to get even better. The next step up is you get, so each one of these plans, ads tools, so you get all the tools from the previous level, so the next, the advanced level, you get the Index Checker and then you get the rank tracker, which is the Rank Rocket and that’s $79.99 per month. And then last is the elite plan, and that one includes, once again all the other tools that previously mentioned, but then you get the PVC tool.
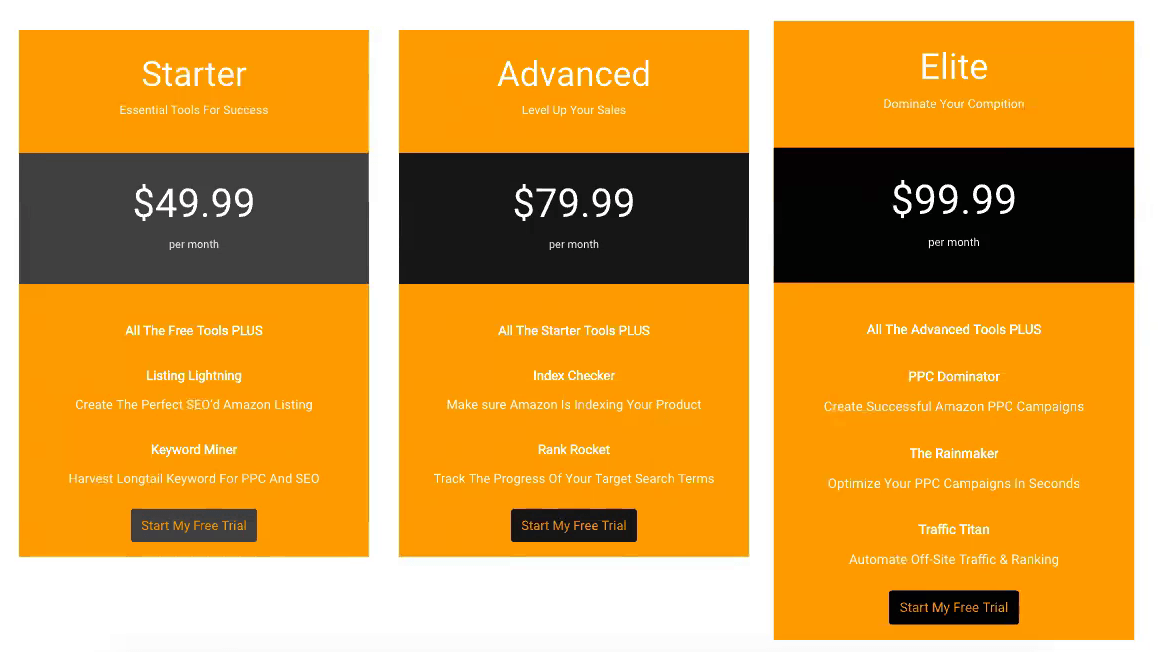
[01:14:12] Andy: So that PVC dominator tool, the Rainmaker tool, and then the Traffic Titan’s goal, which is the off site traffic tool, once again, all our plans come with a free 30 day trial, we don’t charge you a penny for the first 30 days, so you can try all the tools, and if you don’t like it, you cancel before the 30 days, and we don’t charge anything. But we think you’re going to stick around because you’ll see the results of these tools that our users are getting, and you’re going to want to stay on. So I think it will be an essential set of tools in your Amazon seller tool built.[01:14:48] Augustas: What a big collection of useful tools for Amazon sellers, and can you reveal a few things which you are planning to release in the next month for the users?
[01:15:01] Andy: Yes, well I kind of already mentioned and demoed our chrome plugin with the keyword tools, or with the keywords and the search volume, what we’re going to add there is support for international markets. And then we’re also going to add in hopefully some other kind of data points that will give you kind of as much data or possibly even more than some of the leading paid tools out there. Things like competition, you know, giveaways, how many products you need to give away in order to rank, things like that. So we’re going to be trying to add those things here , hopefully within the next two weeks to a month, we got some pretty a good new talent that we’ve recently hired on.
[01:15:49] Andy: So hopefully that’ll get done here pretty quickly. On the main tools itself, I don’t want to reveal too much on the main tools because, we actually have a notepad, and we have 20 tools that we have on that notepad, and currently we have 9, so you can see we got a lot of stuff kind of in process, and in planning. Some of them are pretty complex, and take a lot of data points, and a lot of Api calls, and things like that. So they may take awhile, but some of the things are going to be really neat ways to predict trends, things like that. So I’m not going to go too deep in it because the competition is stiff or for these types of tools.
[01:16:34] Andy: But we got some really cool things that works. The other thing that I can mention is we’re going to make sure that, we’re rolling out some more API integration so you don’t have the option now, if you want to give access to that data, you’ll kind of get a little more functionality with our tools. If you don’t want us to have access to that data, you’re kind of paranoid, and you want to make sure that your data stays your data then you can use the tools the way they are. We’re also going to be adding more options to pass data between the tools. So kind of how you saw with the listing tool, how we pass the data to the PBC campaign builder, the PBC dominator tool, we’re going to be doing more integrations, and things like that. So one of the things, for example, when you’re building your Traffic Titan campaign, like I just showed, well automatically, so any of the keywords that you’re targeting will automatically be added to the rank tracker. That’s just an example of things that we’re going to roll out that’s going to tighten the integration a little bit more on the various tools.
[01:17:42] Augustas: Perfect. And what’s the best way for users and for potential customers to get in touch with your support team?
[01:17:51] Andy: So, if you go to our website, sellerseo.com, there’s a live chat, icon on the right there. That’s a good way to get a hold of us, if you tried to get hold of us on that and we don’t answer, it creates a ticket and that means we’ll just get back to you. The other way that you can get ahold of us, of course, is on Facebook. Facebook messenger is a good way. Last but not least, of course, this is just our email, which is support at sellerseo.com . Any of those ways you can get a hold of us, we try to be fairly responsive. If we’re normally during business hours, we try to reply right away, within a couple of hours at the most. If it’s not business hours, it can take anywhere over the weekend, 24 to 48 hours.
[01:18:32] Andy: We try to be super responsive with any issues or questions, things like that. We also have a lot of help videos, so like if any of this stuff is kind of over your head, I didn’t go too deep into each tool, because we have a limited amount of time. I didn’t want to bore you too much, but if you go to sellerseo.com/help, there’s help on the tools, and then there’s also videos that kind of step you through the process on each tool and kind of explain what the tool is, how it works in a little bit more detail.
[01:19:03] Augustas: Alright. Then the last question, do you have any offer for Demo Mondays viewers?
[01:19:11] Andy: Yes, if you go to sellerseo.com and pick any one of these plans, if you enter the code DEMOMONDAY, just all one word capitalized, we’re going to offer you 30% off, and that’s not just for the first month, but that’ll be for every month that you stay a member of SellerSeo, and not only that, but once again, you’ll still get the 30 day free trial, so you’ll get free for the first 30 days, you’ll pay nothing. And then when your first subscription payment comes up, you’ll get 30% off the monthly fee, and that will continue for as long as you have the account.
[01:19:47] Augustas: Perfect. Thank you very much Andy and good luck in your business. Bye Bye.
[01:19:50] Andy: Thank you so much, it was great talking to you again.