Every month, an increasing number of sellers starts selling on Amazon, making the reign fiercely competitive, and turning it into a game in which only the fittest survive. If you want to not only survive but lead the way, you simply can’t rely on outdated sets of tools and techniques anymore. You must be able to monitor and improve your account, and create a strong direct connection with your customer through follow up emails and external marketing. Quantify Ninja meets those challenges by providing a state-of-the-art solution, an ever-evolving set of tools wrapped up in a stunning, easy to use, intuitive interface.
 14 Days Trial
Quantify Ninja is presented by the founder Yinon Shiryan.
Data and Management Tools
- Sales statistics by customizable time interval.
- Pie charts for sales, profit and customer returns.
- Product performance comparison charts.
- Intelligent order search by customer name, product, order number and dates.
- Product profit computation & analysis.
Emailing
- Unlimited email templates stored in the system.
- Unlimited emails per month to your customers for a fixed price.
- Opening rate accurate date on each template and every email.
- Email multiple files attachment.
- Sophisticated per-product system for emails.
- Bulk emailing option, for a large number of customers in a click.
- Orders’ black list & buyers’ black list.
Facebook Bot
- Drive traffic from your Facebook business page directly to Amazon.
- Distribute single use unique coupons to your prospective buyers on Facebook.
- Get more reviews by following up on your customers on Facebook post-purchase.
Advanced Notifications System
- Real time customizable notifications on sales via Facebook Messenger.
- Product review notification via Facebook Messenger and email.
- Negative feedback alert via Facebook Messenger and email.
- Hijackers instant alert to your Facebook Messenger and email.
Advanced Capabilities
- Hijacked listing instant alert.
- Hijacked listing direct link.
- ASIN Keyword Tracker – track the position of your products by keywords.
- Money-Back advanced reports – get reimbursed by Amazon for lost or damaged units.
List of features covered in this video:
00:00:27 What problems Quantify Ninja Ninja solve and how does it help Amazon sellers?
00:01:01 Marketplaces covered by Quantify Ninja
00:09:14 AB testing and Automated Messaging
00:18:46 How do you attach the invoice or is it an automated invoice ?
00:18:55 How to create a template for an invoice?
00:23:31 Invoice structure and European regulations
00:24:33 Notifying users on sales
00:27:36 How to search ASINS by keywords?
00:29:38 How to search for the reviewer?
00:32:54 How to set up a filter with time frame?
00:34:57 Uploading a new Coupon
00:41:53 Creating a Conversation
00:43:41 What is Generic templates?
00:48:37 Can you just in one sentence review all the missing or not covered items and features?
00:48:44 Money Back tool Overview
00:53:22 Limiting access for VA’s
00:55:23 Pricing Overview
00:57:43 New Features to be offered for Quantify Ninja users
Transcript – Walk-through of Quantify Ninja
[00:00:00] Augustas: Welcome back to another session of DemoMondays. In this video series I invite different Amazon seller software creators and developers, and I ask them to present their products just like this on the screen. And today my guest is Quantify Ninja.
[00:00:20] Augustas: And Quantify Ninja is presented by the founder Yinon Shiryan.
[00:00:24] Augustas: Hello Yinon.
[00:00:25] Yinon: Hi Augustas, how are you ?
[00:00:27] Augustas: I’m good, thank you very much. And can you introduce us to Quantify Ninja please? So what problems does it solve and how does it help Amazon sellers?
[00:00:40] Yinon: Well, Quantify Ninja it’s an all in one tool. It’s a tool that provides you with multiple features, the ones that we think that is the ultimate set that gives you plenty of features that we believe that every seller should have in order to succeed.
[00:01:01] Augustas: Alright, so we will look into all the features very shortly and in what marketplaces does your software work?
[00:01:11] Yinon: Well, it’s about regions basically. So, North America regions include Amazon.com, Amazon MX, and Amazon Canada, we support EU region, which includes all marketplaces in Europe, we support Japan, Australia, and now India too.
[00:01:34] Augustas: Perfect. So you’re covering the whole world. And what kind of Amazon sellers are you targeting with this software? What is the best fit?
[00:01:43] Yinon: Well, we actually fit to probably most sellers on Amazon. We aim basically for most of our users are private labellers but not only but most of the features are for everyone, but we have some features that are basically only for private labellers, but it fits for everyone, for all the starters, from beginners to professionals. We have customers with few sales a month to sellers that generates more than $12,000,000 a month.
[00:02:28] Augustas: $12,000,000, cool. So let’s jump into the Quantifying Ninja software itself and see how it works.
[00:02:39] Yinon: Alright, so let me just share my screen so basically quantifyninja.com is the web address. And we provide also a chat. If you want to ask us questions, you can just click on the Facebook chat and write to us. We do everything we can to respond as soon as we can. And we support, of course email support, chat support, and so any questions you might have, you can go to the website and ask us. So, let’s dig into the software and maybe I’ll say a few things about myself. I started as a seller myself on Amazon back on 2013 and there were many tools that I found that were missing for for seller on seller central. And so I started coding the stuff for myself and at some point I gave it to my friends and my friends were really excited to use it and they were really satisfied from what I did.
[00:03:53] Yinon: And from here to there it became a quantified Ninja. And since then I’m not really selling anymore on Amazon and I’m really focused on the software because it’s just hard to maintain two businesses all at once. So what you are going to see is that I will log into my account and in my account, since I’m not selling products anymore, you will see a lot of Zeros. And you can’t really see all the details here, but you can have everything that I’m saying you will be able to see on the watch tutorials in the software and you can see everything, there will also have video tutorials, but I will speak today in general because you can’t really talk about everything, there so many things in the software. So we will start about the dashboard and the dashboard in Quantify Ninja shows you a real time results.
[00:05:01] Yinon: And we update your sales very frequently, like every 10 minutes for every seller, which is quite fast. It’s actually faster than Amazon seller central itself. So you might see here results, don’t see yet on Amazon seller central. And sometimes I have many sellers writing me that they have more sales in Quantify Ninja than they have on seller central. And basically what I tell them is just wait 10 to 15 minutes. Then seller central is updated. So what you see here is that today and yesterday sales, and you can see the pie charts, how the sales is dividing. I found it very helpful because in seller central it’s really hard to say how many sales you had from each product. So since the day just started on Amazon.com, you see zero sales for today, but if there were sales today that you would see in here another pie chart and on every pie chart you can click on orders to see every order you had and you can actually drill down for every order and see those orders since it’s just yesterday’s.

[00:06:20] Yinon: Most of them are still pending. But if you click on this order for example, you can see all the commissions taken for every order and see how much money you spent on the fulfilment, how much money you get from shipping, commission and everything. And then the final profit which is here in this case, is $8.95, you made form how much that the buyer paid minus all the fees and minus the product cost that you can edit so you can also see if there was a promotion on those orders. But there is actually a different option to see only promotion, I will show it it in a second. So if you want to, you can filter the dashboard by specific marketplace.

[00:07:19] Yinon: But since this is an Amazon.com or precisely North American region, we have here only three marketplaces. If this was an EU region, you would see here all the 5 channels. So in EU, if you want to see only sales from Amazon Germany, you can do that by using the filter. So here I can just select one or all channels. I can filter by specific product or by specific timeframe. We have predefined time frames. But you can add custom. So if you go here, for example, and you set up a custom time frame, let’s take just 30 days for example, then you see the total number of sales and you can do the same thing I showed you earlier about the orders. You can click on the others and see all those orders and dig down about each and every order.
[00:08:11] Yinon: But you can do more than that because sometimes you give coupon codes and you want to know how many were redeemed, right? So if you click on the promotion, you can see exactly all the promotions given for each of the orders. But this is not enough. Basically many sellers came to me and asked me to show up a summary of how many promotion are redeemed from a specific coupon code. So what we did is just created a summary of a promotion. So you can see here a promotion summary and this shows you the exact number of coupons taken from each of the coupon set. And this is fair to the to the time frame that you have selected. So if you select a year ago, then you would see all the coupons summary for the deal.
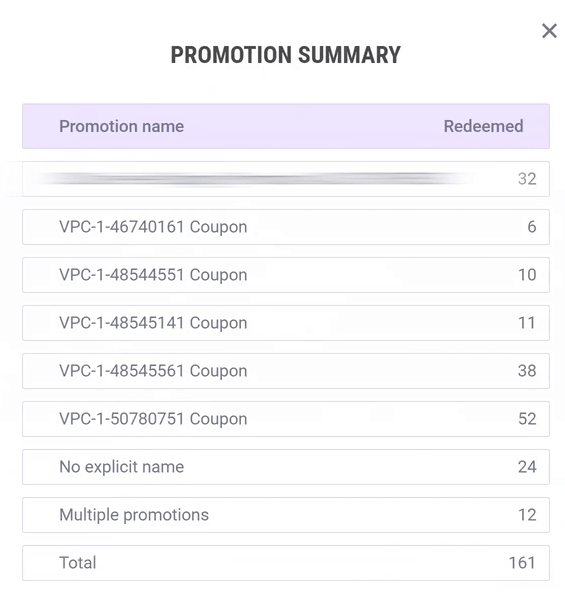
[00:09:14] Yinon: So this is really helpful if you are sharing coupons and I really encourage you to try it out. So this is about the dashboard. So about the automated messaging, we have the most advanced tool, I think in the market. This tool is basically have a lot of features and there are lot of things to talk about, but I will speak only about the important stuff. So we have the open rate but because I’m not selling on Amazon anymore and all the numbers shown here are zero. But you can see the open rate in percentage. And you see here, there’s two numbers here. It’s because you can set up even an AB testing tool on a specific template. And let me explain what is an AB testing in the automated messaging. So you can set up a template and the template is a text with variables that can be replaced, I will show it in a second, but you can set up also more than one variation of a template.

[00:10:25] Yinon: So that means that if we need to send that, say that this email should be sent like a one day after the item is shipped and we have 100 items that were shipped yesterday. That means that we need to send 100 emails today. So if you set up two variations of the same template,we can send only half for the first variation and another and the second half for the second variation. But actually it’s more sophisticated than that because it doesn’t really split it to 50/50%. It gives more probability for the email that has the higher open rate to be sent more. So in this case, for example if the main email has a 70% open rate and the second email has only 50% open rate then the first email from 100 emails that we totally need to send, we will send more from the first email.
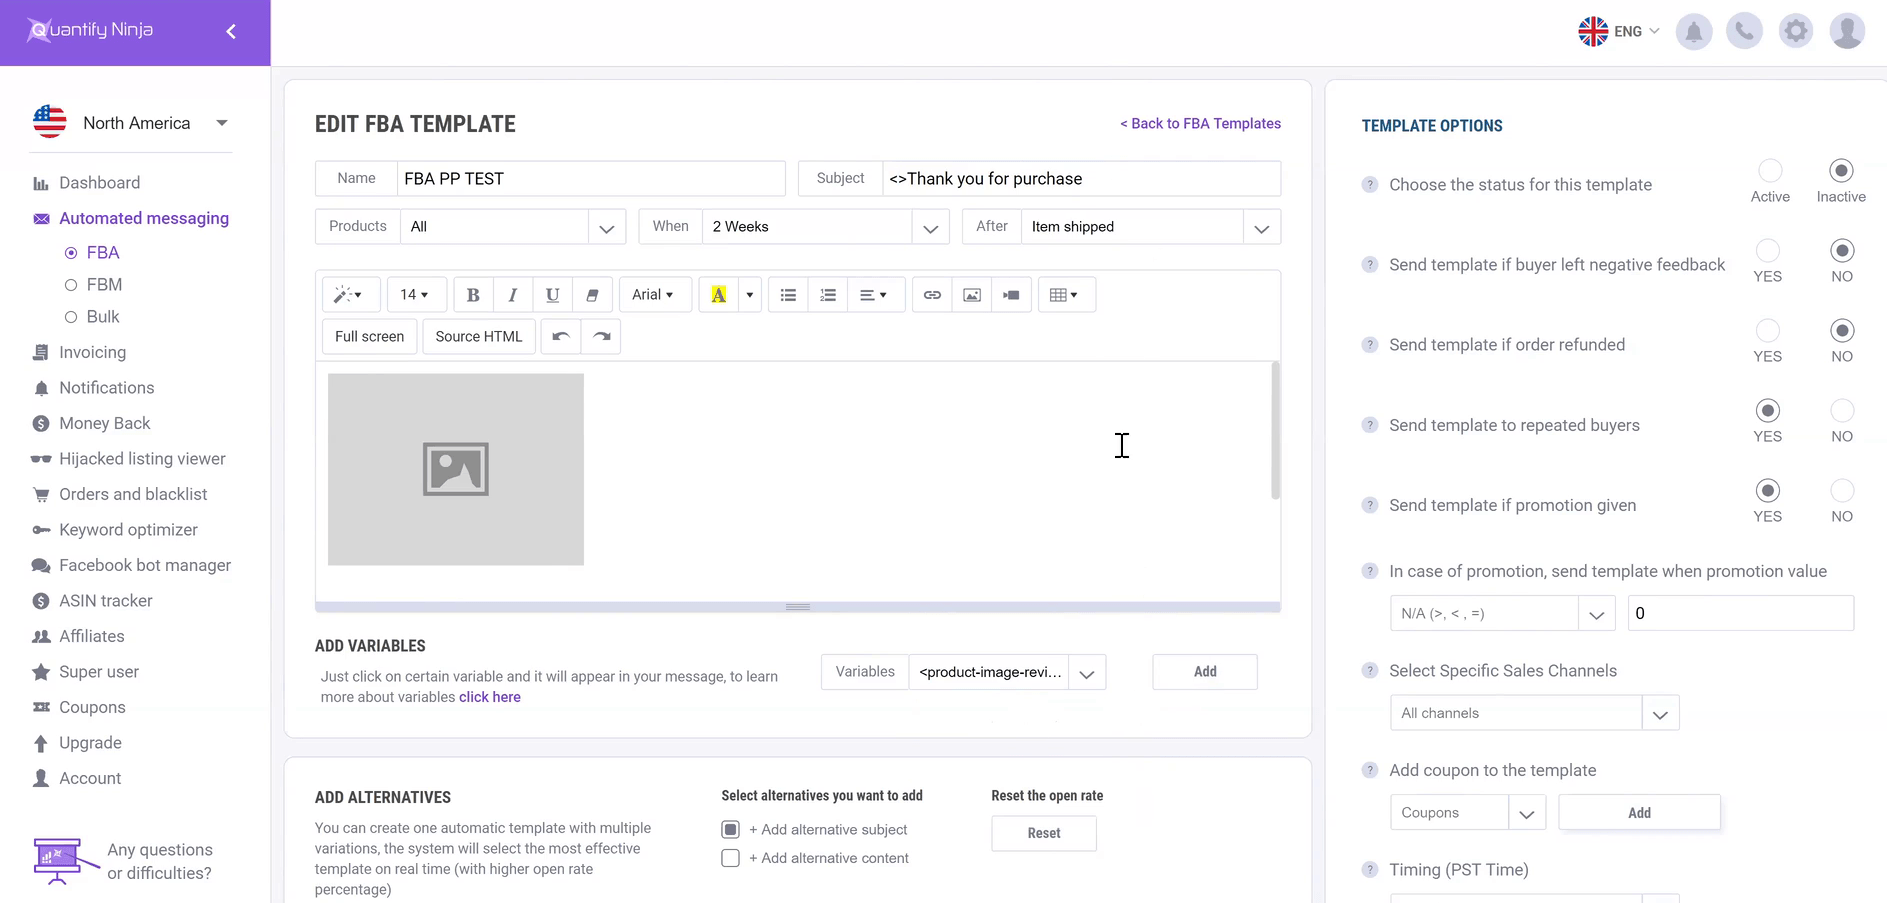
[00:11:28] Yinon: I hope it was clear enough. Alright, so let’s dig in inside the template. So clicking on every template gives you the option to set up the content so we have a name and where you can set up the products, the specific products that the system will send emails to, you can set up a subject and you can set up the time from when you went into this email to be sent so you can set it up ASAP or 1 day, 2 days, et cetera. And then you can select the event, the trigger that this email will be sent to. So we can say item after item shipped or after item delivers. So if I click here, item shipped, that means that this email will be sent to weeks after item shipped. Now here you can set up the content and Quantify Ninja, provide a very flexible option.
[00:12:30] Yinon: Basically you can send anything you want because we actually have the option to set the source html. Now most of you probably are not programmers, but if you want to have a really nice email you can outsource this job to a freelancing on Fiverr, it should be very cheap and you can create a wonderful html source code where you can just paste it here and then see it. And when you click it again, you can see the actual content. But if you don’t want to, you can walk here on Quantified Ninja with our editor and you can set up anything from images. So you can have images uploaded from your computers, links, fonts and everything is super flexible. And if you want to add a variables, you can do that as well. We have a list of variables here, so you can see we have from product short name, product name, product review link, all the variables that you can have.
[00:13:41] Yinon: But you also have some special variables that I want to focus on. So one of them is the product image, and product image review link. So if I click it and then click add, it will add the image of the product. Now here you don’t see the product because this one is a template, and this template can be sent to buyers who bought multiple products. So it could be sent to multiple buyers. So the system knows to replace this image to the right image of the product that the buyer purchased. So if I set this template for all products and you bought product A and someone else bought product B, you both get a different email. Now then the nice thing about it is that the email itself is a link for your review page.
[00:14:45] Yinon: So it’s actually a link that links to the reviews page of that specific product that was purchased. So this is an option to use if you want to add an image of your product that links to the review. You can of course have all the product image without the link or any other ID and customer name, anything you want, you can add in the content but also in the subject. So if you want to contact the buyer name personally in the subject, you can do it as well. You can just type it or click the ad when you are focusing on the subject. So we can just write customer first name and then when you’re done you can actually test it using the test button here. Now the test button sends this email to your email address that you have signed up for in Quantify Ninja.
[00:15:47] Yinon: And what it does, it actually goes to our database and search for any order, a random order. It takes a random order of your sales, and just walks on this order. Because the system needs to replace all the variables to the orders details. So it has to be tied to a specific order when you do a testing. So what it does, it goes and bring up a specific order and change all the details according to this order. So we have a lot of configurations here. You can set up to who you want this email to go to, to who you don’t want this email to go to. And if a refund order was made, if a negative feedback left, if you don’t want it to go to repeated buyers, if you don’t want it to go to someone who used a coupon code or you can even set if someone used a coupon code with value more than $4, you can do that as well.
[00:16:55] Yinon: And of course you can use a specific sales channel and this is really nice feature for the EU region. Because if you want to set up different languages for every template, you can do that by setting up this template only for a specific marketplace. So this one is North American region. We have only three, but if you are using the EU region you will it have all of them in EU marketplaces. So you can set up, let’s say Amazon France, and then just write your template in French. You can set u, the timing if you want this email to be sent in the morning, noon or night in Pst time, or you can exclude products and of course you can add files to the template. You can add multiple files if you want to. And the new feature that we just added recently is that you can actually add invoice to the template.
[00:17:54] Yinon: So I will maybe talk about it in a second on how to create an invoice template. But once you created an invoice template, you can send an invoice within the automated messaging and some of my users are actually using it to gain more reviews because what they do is that they write on the subject, your invoice is attached. Now most users, especially in the EU, they open the email because they need the invoice for the tax returns. So they open it and then in the content you can add more details. You can ask them for a view and you can actually ask even for review inside the pdf. So I will show it in a second, but now just know that you can attach an invoice to an automated messaging. So all the emails that will be sent, will be sent with an invoice.
[00:18:46] Augustas: How do you attach the invoice or is it an automated invoice ?
[00:18:55] Yinon: You need to create the template of the invoice. I will show it in a second. And then after the invoice template here in the manual invoicing, after it was created, you can select it here and then once you selected the invoice, then the system will automatically when it creates the invoice, it will automatically take the data of each of the orders, and then just put all the details in the invoice. Oh, by the way, I’m sorry I forgot about the AB testing. If you want to add the AB testing, it’s really simple. All you have to do is just, the default is without, but if you want you to, just click on the add alternative subject and you can add her another subject.
[00:19:44] Yinon: So this is the subject number 2 for example. So you can just add here another subject or you can also add another content and then you can have two contents. It will not send both to the same buyer of course, but it will send some of their first one of the first variation and some of the second variation. So this really can help you improve the open rate and then increase the chances that people will actually write reviews on your product. So we have the same options for FBM. So if you are selling on FBM, you we can use it as well and we have a Bulk option. This is also an option if you want to send a one time email to all customers that purchase from you on the last six months, you can do that as well with the bulk options, I won’t be focusing on that, but just know that it exists. So this is regarding emails and by the way, we send about 150,000 emails a day. It’s really a lot and that’s what we do and we do it very great. Some people say that the email is dead, I don’t agree with that, we can see that the open rate, even though the buyers do opt out from a seller’s emails, it still shows that about 30% average open rate, which is great.
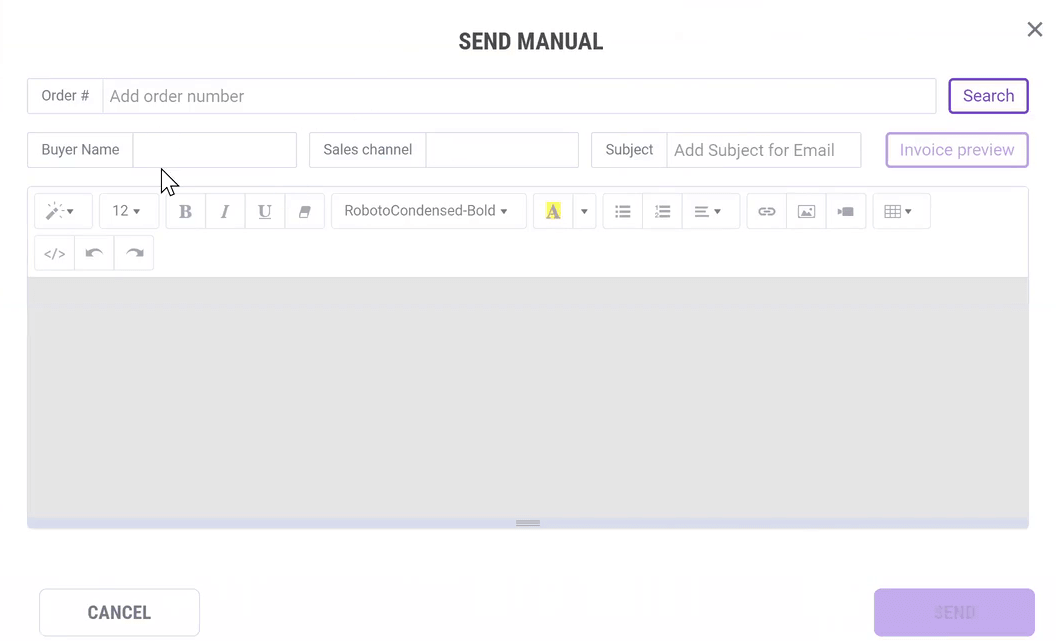
[00:21:27] Yinon: So so let’s talk about invoicing because I mentioned it earlier, so I don’t want to save this one, so I’ll just hit yes and I will go to invoicing. So invoicing is basically if you want to send invoice to your customers, you can do it either manually or using the automated messaging. So as I said earlier, once you created the invoice, you can attach it to the automated messaging, but you don’t have to, if you want to send it manually, you can do that as well. But before you do that, you need to create the template. So here you can see, this is the template and you can add an image of your own. So if I click here, you can add the image. So you just select any image and then you just go next on the details and you write your company name, all the details that you need for creating the invoice.

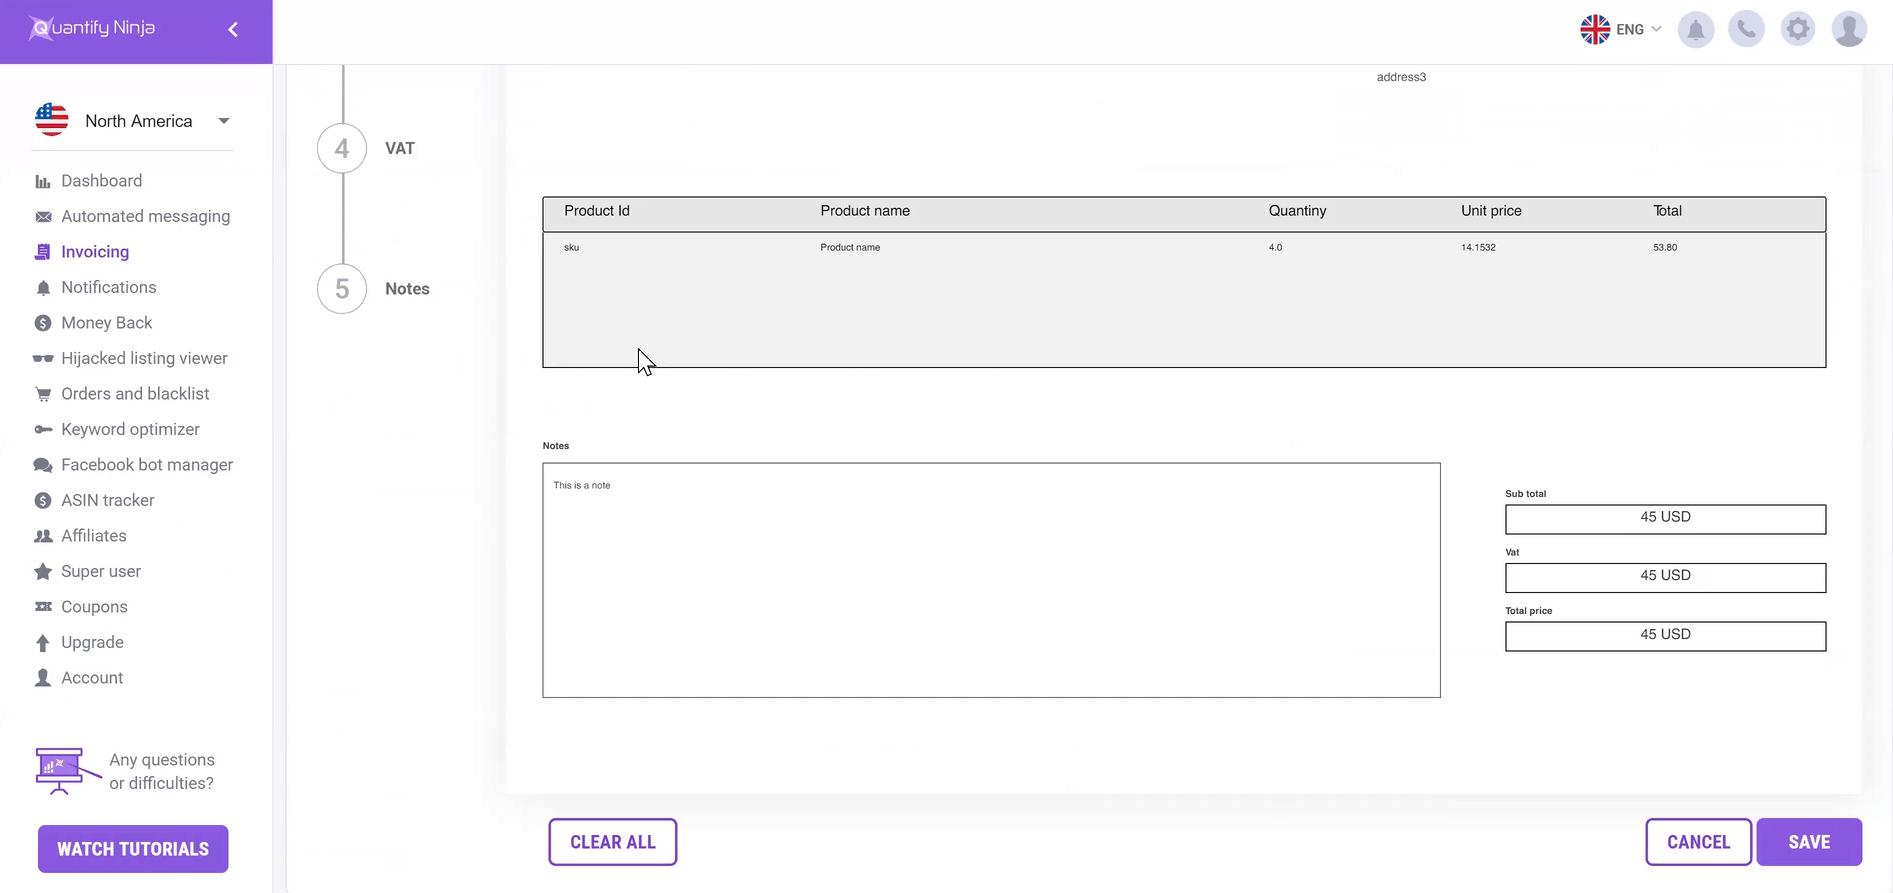
[00:22:23] Yinon: And you set up the VAT percentage and once you did that, you can click on save. Let’s just open ones that I already did. So this one, for example is with 12% VAT, but you can set it up as unit, and then once you have the invoice ready, if you want to send this invoice, you can just click on send manual and then you add in here the order number and the system will fill up everything and once it is done, you can click on the invoice preview and then it will show you the invoice itself, and then click on the send button to just send it to the user. Really simple, you don’t need to fill up the details in the invoice. We do everything automatically for you. So this is really helpful for lots of sellers, especially in the EU where buyers really needs the invoice for the tax return.
[00:23:31] Augustas: And is the invoice structure compliant to the European regulations?
[00:23:35] Yinon: Yes, and the best thing about it is both on the automated messaging and invoicing, you get an unlimited usage. This is one of the best thing in Quantified Ninja is that whatever we try to do, we try to give everything unlimited for a fixed price. So if you use our automated messaging, you get unlimited, send one email a month or 1 million emails a month, you still pay a very low fixed price. So you also have unlimited invoicing and all the features that you have here, which I will maybe speak about in a second. So let me jump to notifications because it’s one of the features, that many sellers like a because you know, you hear about groups that everyone, how many times you refresh your Amazon Seller Central, right?
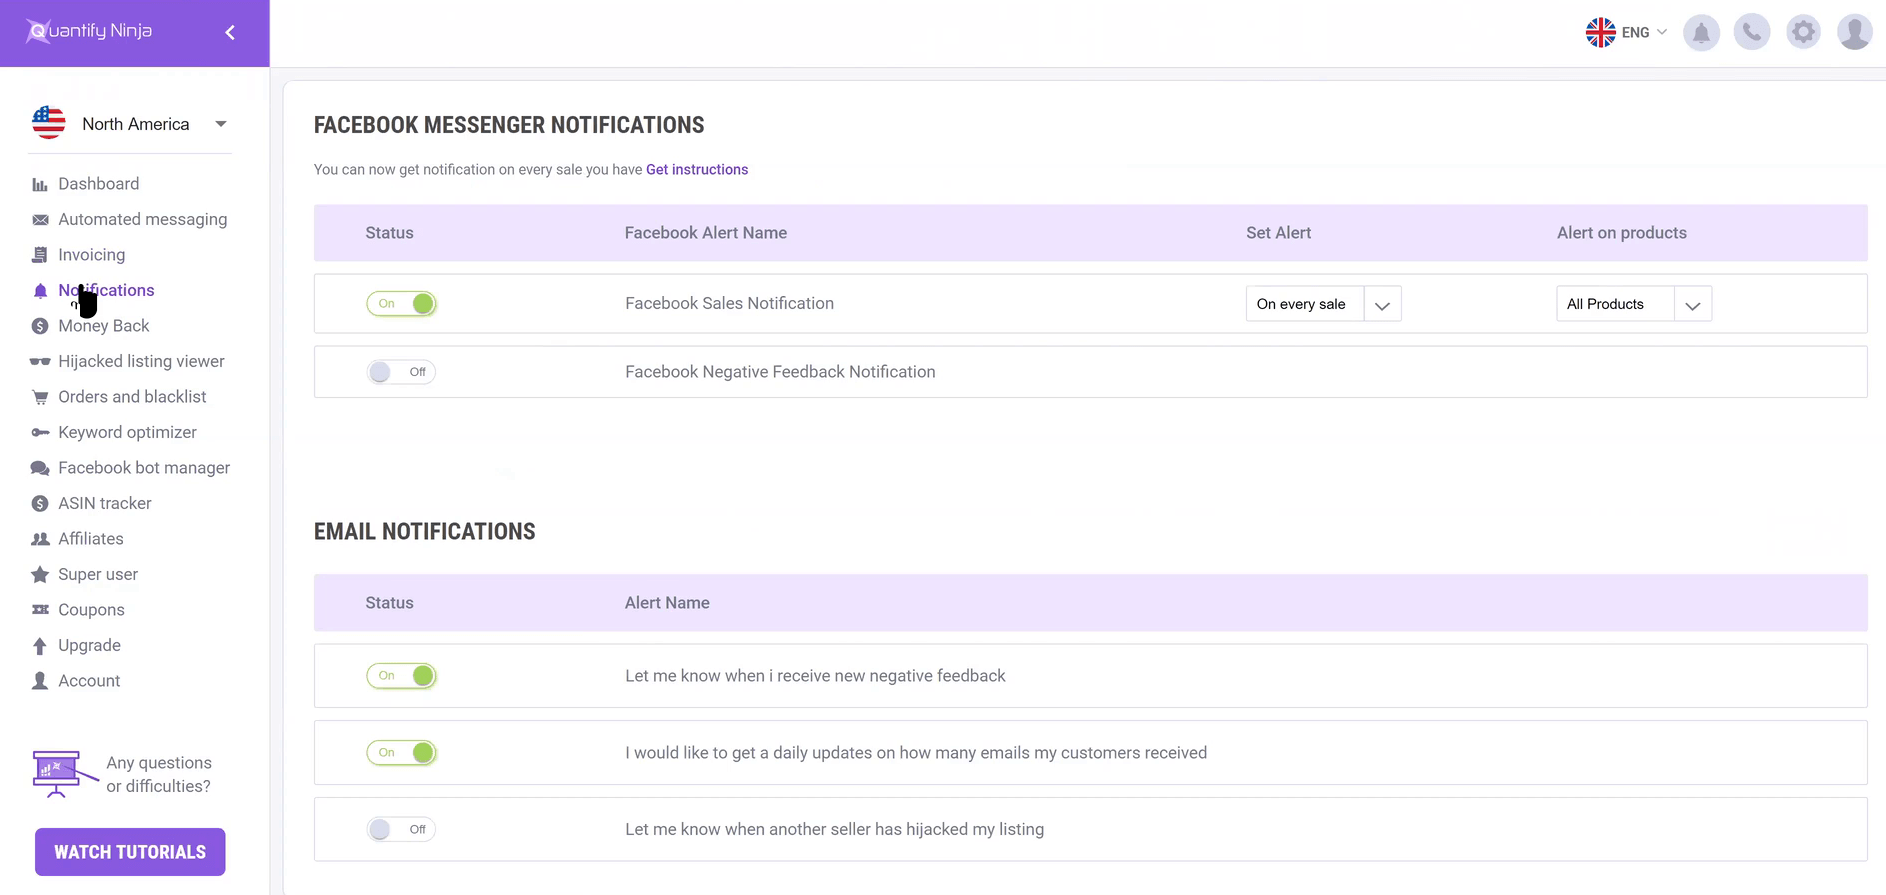
[00:24:33] Yinon: And people say that thousands times a day. So one of the features that are made, I wanted to notify users on sales. Now I know not all sellers want this feature, but you don’t have to use it, but some users really like to get a notification about every sales they have. So you can connect your Facebook profile and then once you connected this profile, you have instruction here. It’s really simple, you just click it, just click the link. That’s it. Once you click the link, you are connected to your Facebook profile and we send notification to your personal messenger on every sale, but you don’t have to get a notification on every sale. If you want, you can set up a 5, 10, 20, or any other number of sales you can or even on a specific product.
[00:25:30] Yinon: If you don’t want to get sales notification, you just launch a new product. They just want to know when this product is sold, you can set it up for a specific product, but the default is for every sale and for all products and you get it directly to a messenger and it comes with the buttons. So if you get a new sale, it just shows you, hey you get a new sale and then you have a button, you click it and it shows you all the sales you had today. Like you’ve sold 5 products of this product and 4 products of that. So it’s really a nice feature. We have a lot of customers who really got addicted to it, so you can try it out if you want. It’s a great feature. We can also give notifications on negative feedback and we used to have also product reviews, but since we are on Amazon APP store, they’ve requested us to remove this feature so we don’t really notify on reviews at the moment.
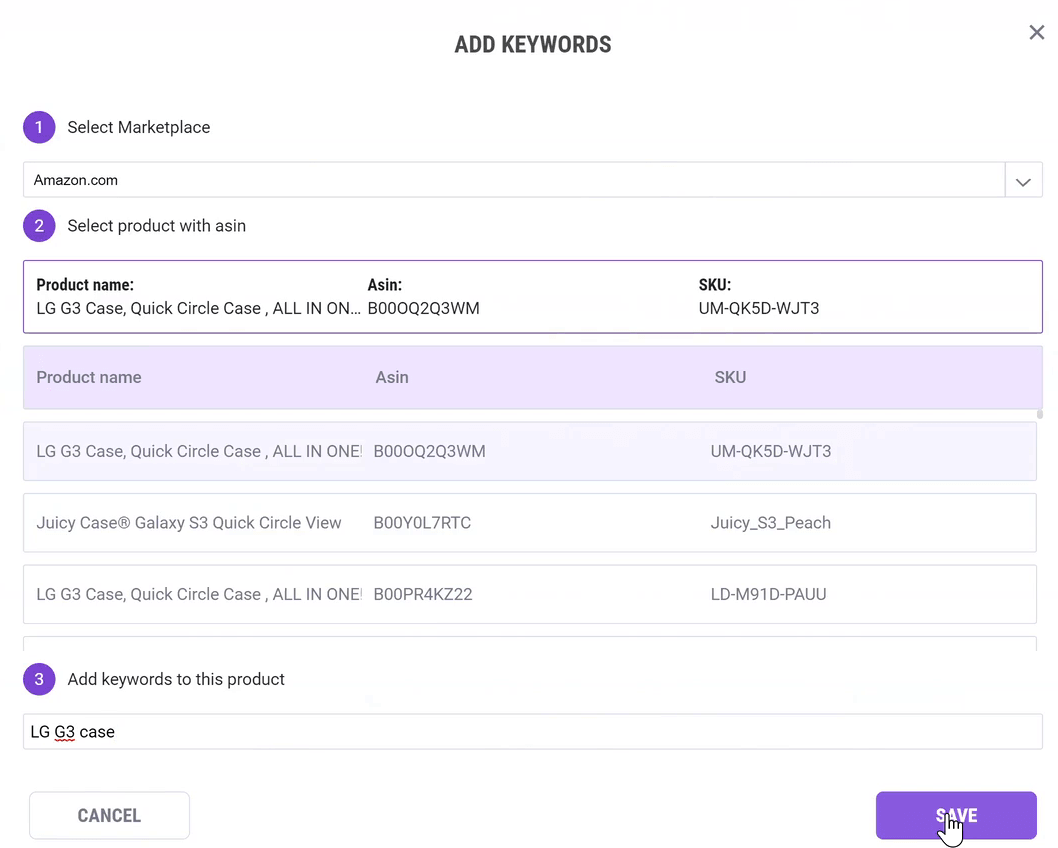
[00:26:32] Yinon: We will also give of course email notifications for most of the things that we also give on the Facebook messenger notifications. So maybe we can jump to the ASIN tracker. ASIN tracker is a great tool if you want to get the data on your products and where it stands. So if I sell, for example, an Iphone case and I want to know on Amazon.com, for example, where is my Iphone case is located in matter of position in regards to specific keywords. So let’s say that I want to take this LG G3 case. This is actually a product that I’ve sold in the past, and then I want to know where is this product located when someone looks for the phrase, let’s say LG G3 case.
[00:27:36] Yinon: So I just add this phrase and I do just save and the system will check every few hours and you can see this is just dummy keywords that I have added to test the system, but of course you can add meaningful keywords that you think that your customers are actually searching for your products. And then know exactly the spot. And let’s say that it shows spot 5. That means that you are the fifth product from the top. Now it’s a little bit different if you are searching from Texas, California or Europe. It could be different. It could show different results when you search a specific keywords, but you get an idea. I mean it can’t be super accurate because it shows up different results, but it can give you an idea about where is your product located.
[00:28:39] Yinon: And if you click here, here you won’t see it, but you will have it graphic. We have more than 3 results. You will also see the graph and then the progress that you made with your keywords. So this is a very powerful tool that can help you. No worries. Your product located, fell into a specific keywords. I wanted to talk a little bit about the order sections. So order section is a great tool if you want to search orders. Usually it is used by sellers who wants to either write a message to a specific customer or find some order, usually if someone wrote you a negative review, you really want to find this person. And now Amazon doesn’t let you because you can’t link between the reviewer to the actual order, right?
[00:29:38] Yinon: So there used to be tools that actually hacked Amazon website and found the reviewer but now these days they block this option and you can’t really know who is this reviewer. But Quantify Ninja actually gives you the option with a wise search, which is in the terms of service, because we don’t really show you who’s the reviewer, but if you can make your wise guess. So if you have a reviewer name let’s say James123, it’s the username. Then you can search on Quantifying Ninja only buyers that has the J,A letters in his name. So if I click search, it will just give me all the buyers that say, let’s take this one for example, and see the buyer name is Victor James, so every order that it finds now is with the letters J,A in the name.
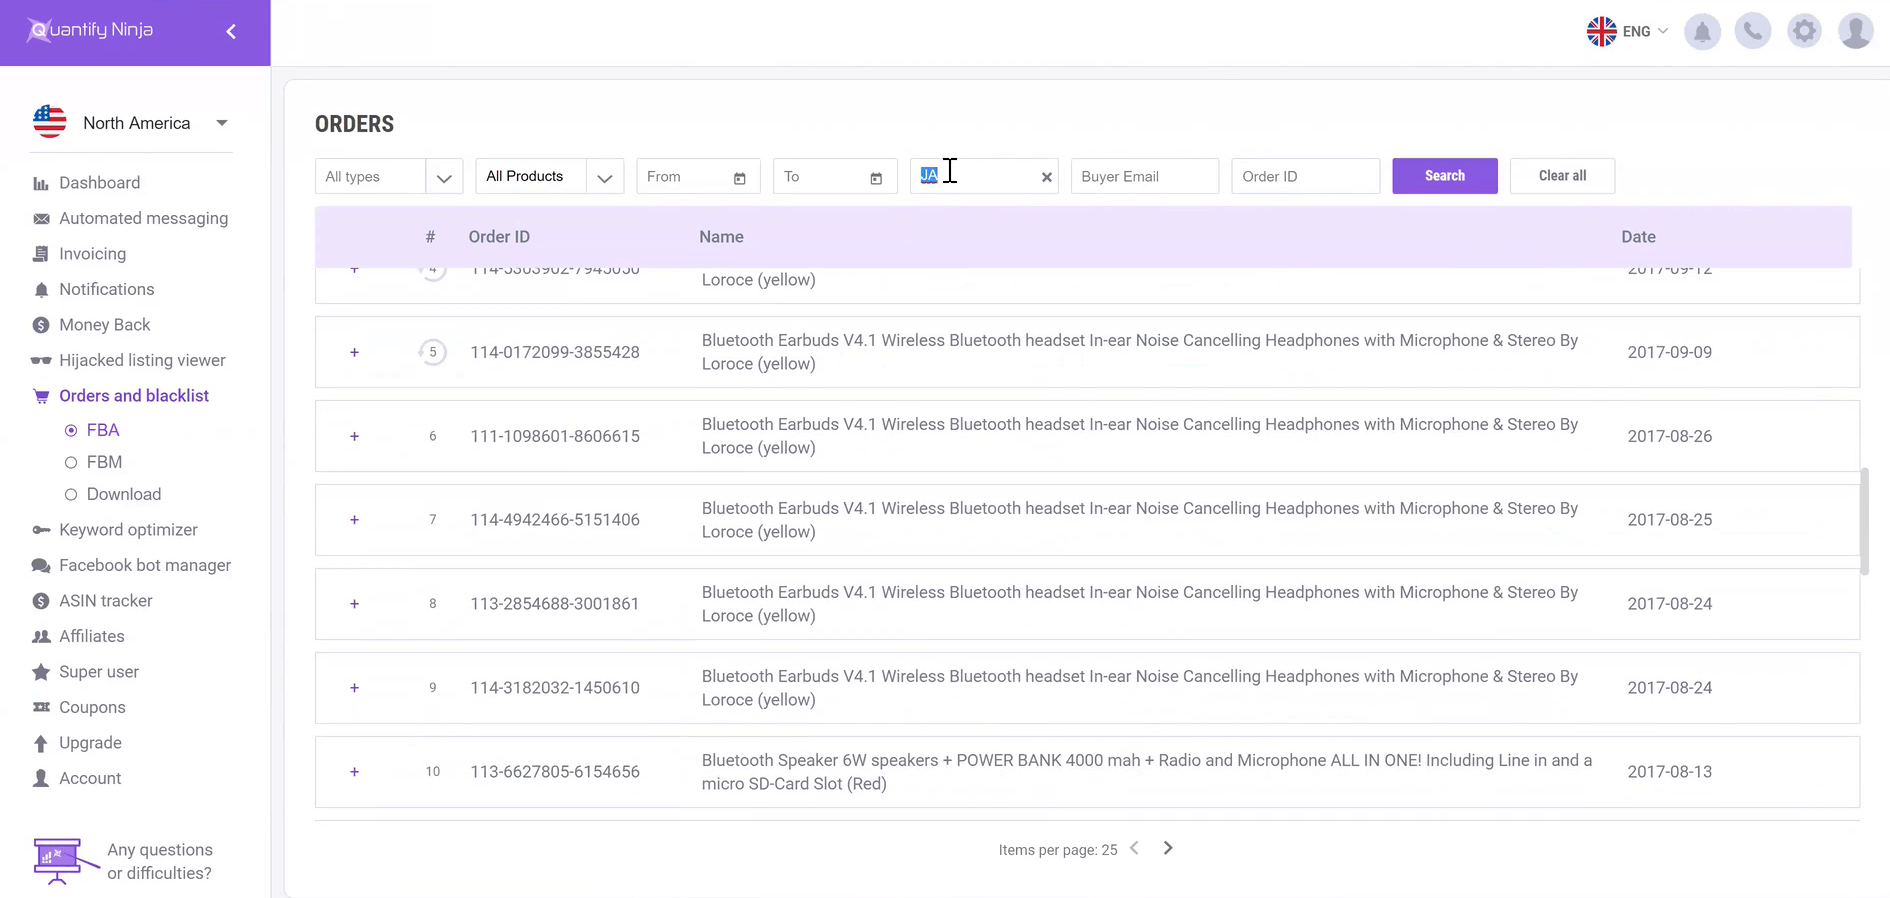
[00:30:38] Yinon: So it just gives you more chances to find the reviewer. If you want to find the reviewer, you know which product he was reviewing. So you can just set the specific product and you can set the time range and then just type some letters of his name and just find the reviewer. Now you can see also if someone had a refund, you can see that also, you can just click on any of the orders and see all the details. Here you can also exclude an order from feature template that actually means that you can actually put this buyer on the blacklist, but what’s really nice about this system that you can actually send message form the system to the buyer, a manual message. If click send message, then you can see the name and the email address, and then just select any template.
[00:31:40] Yinon: So let’s take a specific template for example. So I take this template and then it already replaces all the variables. Okay so here for example, you see garlic press in the template, it was product short name, so it already replaces the name also the link for review, everything is already replaced and you can just click on the send and it will send the email right away. You can do the same for FBM templates, but I want to show something about the download section, which is a great tool and I want to show the options and what you can do with it. So the download option basically gives you the option to download your set of orders and buyers to a file. So you can do that if you want to investigate or analyze your reports, but most users want to retarget their buyers from Amazon on Facebook.

[00:32:54] Yinon: So what you can do here is that you can set up a filter with the timeframe and then you can say, I want to take only buyers supporting specific date and that did not issue a refund and that will not be repeated buyers and did not leave a negative feedback that bought only on Amazon France and the purchase is only specific product in FBA and that spent only more than $5. And then once you set up this filter, you can use the only data necessary for Facebook advertising. And then you can download this file and you can upload it to a custom audience on Facebook and this way you can actually retarget your buyers from Amazon ON Facebook, if you want, you can create a lookalike from this audience and then retarget them again.
[00:33:55] Yinon: So this is a great tool and we actually implemented an automatic upload, so I will just describe how you do it manually. Just download the report and then go to Facebook and upload the file. But if you grant access, if you click here, it will ask you to grant access to your ad account on Facebook and we’ll upload it automatically. So this actually saves you 5 minutes walk, but if you don’t want to, you can just do it manually. So this is a great tool, and we just launched it a few weeks ago and you can really test it and try it out, because you know, retargeting is a great tool. When you retarget your customers, it’s customers that you know they are interested in your products, you know they bought your products. I mean, why not we target them. okay, so I want to talk a little bit about coupons section because this is also a tool that helps you manage your coupons.
[00:34:57] Yinon: So if you are sharing coupons, you can upload it to Quantify Ninja simply by clicking on the upload new coupon. And the reason we made this feature is there are multiple reasons. One of the reason was that when I was a seller, I actually downloaded around 30, 50 coupons and then I just stored it in my computer and I forgot about it. I didn’t know when is the expiration date, I didn’t know what is this coupons for, and you’ll have to be very organized to just maintain coupons that you downloaded from Amazon. So this is the first use actually you can just download the coupon and upload it to, you download it from Amazon and then upload it here on Quantify Ninja, you give it a name, you set an expiration date and you have it here.
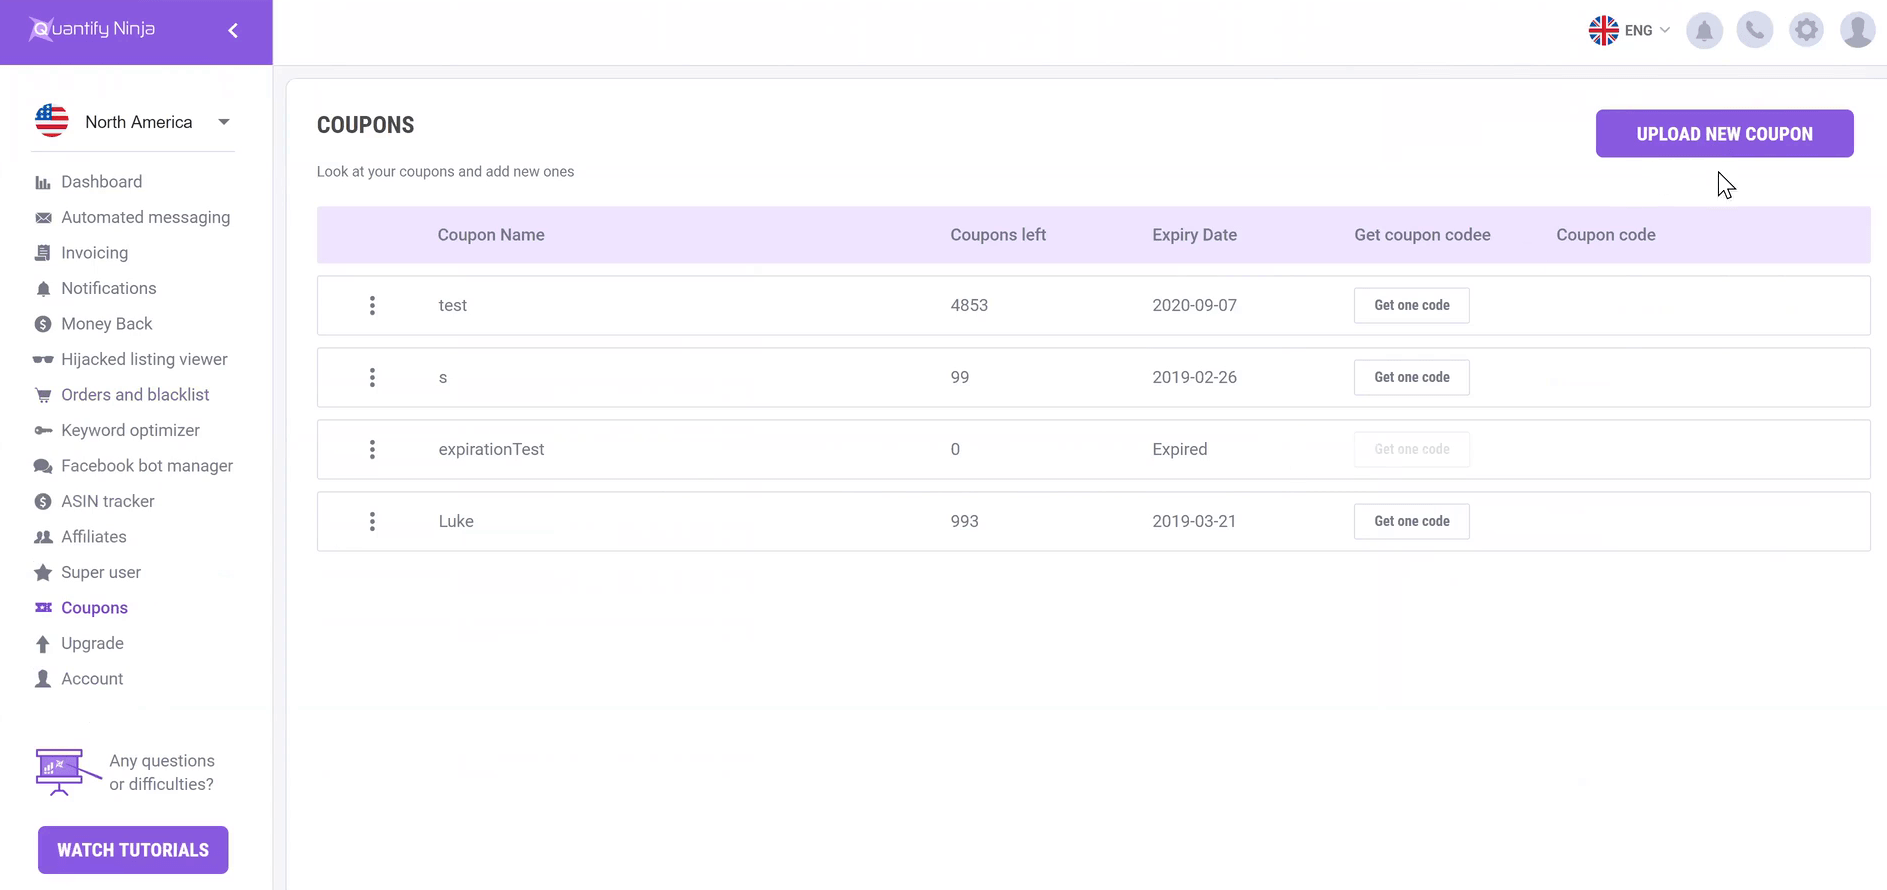
[00:35:49] Yinon: If you want to use one, you just click one. You click one, you have a copy to the clipboard and you can use it. But this is not the only place where you can use it. So if I click get one coupon, then you know, it just takes one coupon of the list and we’ll never show this coupon again, if i click it again, it will show me a different coupon. But what you can do is you can actually use these coupons in the bot that I didn’t spoke about, but I will speak in a second or in the automated messaging. So if I go to the automated messaging, see this coupon I gave it a test name. So if I go to the automated messaging and I go to a specific template and let’s say that I’m giving everyone that bought from me, I want to give them a 10% discount.
[00:36:38] Yinon: Now you need to be careful about it. Do not offer coupon for review of course. Just keep everything to the Amazon terms of service. But there are some things you can do with coupons, so if you want to give coupon codes to everyone, that’s fine, you can do that. It’s not against Amazon terms of service. So you can tell them something like here is a 10% coupon on my entire store. And then you have here the coupon section, you can select the coupon and then edit. If I focus here and I click add, it should add it exactly here. So now if I save it, let’s give it a name just so we can remember it. So this is Augustus, if that’s okay with you.
[00:37:35] Yinon: Augustus. And let’s save it. And now even if the template is not active. Active means that this will be sent automatically, so you can send it automatically and it will just take one coupon at the time and will be sent, but you can set it as inactive. And then when you search for another, if you want to send only to specific users, you can do that as well. So if you click, if you search a specific order here, so I’m clicking the search because I don’t have a specific order that I want to give a coupon code, but if you have a specific code or you can just search it and then go to the send message. And then what I showed earlier is that I selected this specific template, but this time I select the template with a coupon code and you see that here is a 10% coupon on my entire store and here’s the coupon code and then you just hit send.
[00:38:26] Yinon: So this actually saves you a ton of time. If you will have a coupon code that you are sharing manually, then you can set it as a template but keep it inactive and then just send it when you want. Of course you can use it also on an active template and then it will be sent automatically. The third option, what you can do with the coupon section is that you can use the coupons that you uploaded here in the Facebook bot manager, which is the next feature that I’m going to talk about. So for a lot of you who are using ManyChat or ChatFuel or lots of softwares out there that are giving them the option to create conversations on Facebook messenger in order to drive traffic from Facebook to Amazon. So we created this option too. But the advantage in our system is that we are really focused on Amazon in opposed to other companies that they’d give the general concept but they think they can just give you the right tools for Amazon because they just don’t have the access.
[00:39:35] Yinon: But here we have for example the coupon codes, we can actually use it in order to create conversation. So let me show you, for example, what I mean by creating conversation because I bet some of the listeners doesn’t really know what this bot is all about. So I’ll give us a short introduction about the bot, because bot is like a totally different product. It’s not a feature. I call it a product because it’s very wide and there’s so many things you can do and users are actually using it in order to get more views or to show products when they launch a new product, so let me show you how it works. So let’s start by creating a new conversation and I will set a conversation that let’s say that I want to give a free coupon to someone, in order to get more reviews.
[00:40:34] Yinon: I want to show coupon codes, so I’m starting to build the conversation and then to trigger the conversation, we can trigger it in multiple ways, but one of the ways is just creating an ad on Facebook. But instead of sending the buyer from the Facebook ad to a landing page, we’re going to use an objectives on Facebook. That means that by clicking on the ad, instead of going to the landing page, it will open up the Messenger. So let’s set up this conversation that will be triggered when someone actually clicks on the ad. So let’s say hi there and let’s use a variable with a name. So let’s say the buyer first name. So once they did that, I already can test it.
[00:41:32] Yinon: So if I click here on this plug in, then you see my older testing so I can test it now. So now you see how you known, because this is my profile. If you use it yours, you’ll see your name. So let’s add another text and let’s ask him, would you like a coupon code for my new product, let’s give him an option to say yes and no, but this is just an example. Of course it could be much more complicated scenario. So let’s type yes and no, and let’s say that if he says yes. So I’m standing on the yes. And then I continue to flow from the yes. So if he says yes, I can tell him cool here is your coupon and then I can just add coupon and then you can just select one of the coupon set that you’ve uploaded in the coupon section.
[00:42:46] Yinon: So let’s just save and then let’s go to the no. Now when I click on the no, the flow under the yes is gone so it’s not really gone it’s just hided. So when I click the yes you can see the flow under the yes when I click the no, you can see the flow under the no. And let’s say okay, maybe next time, now you can already test it. So if I Click test, then you will see Hi Yinon, would you like a coupon code from a new product? Let’s say yes, I click on the yes. And then the system will send me, cool here’s your coupon. Now it’s really cool because it just takes just one coupon and it gives you through the bot. Now it’s really easy to do that.
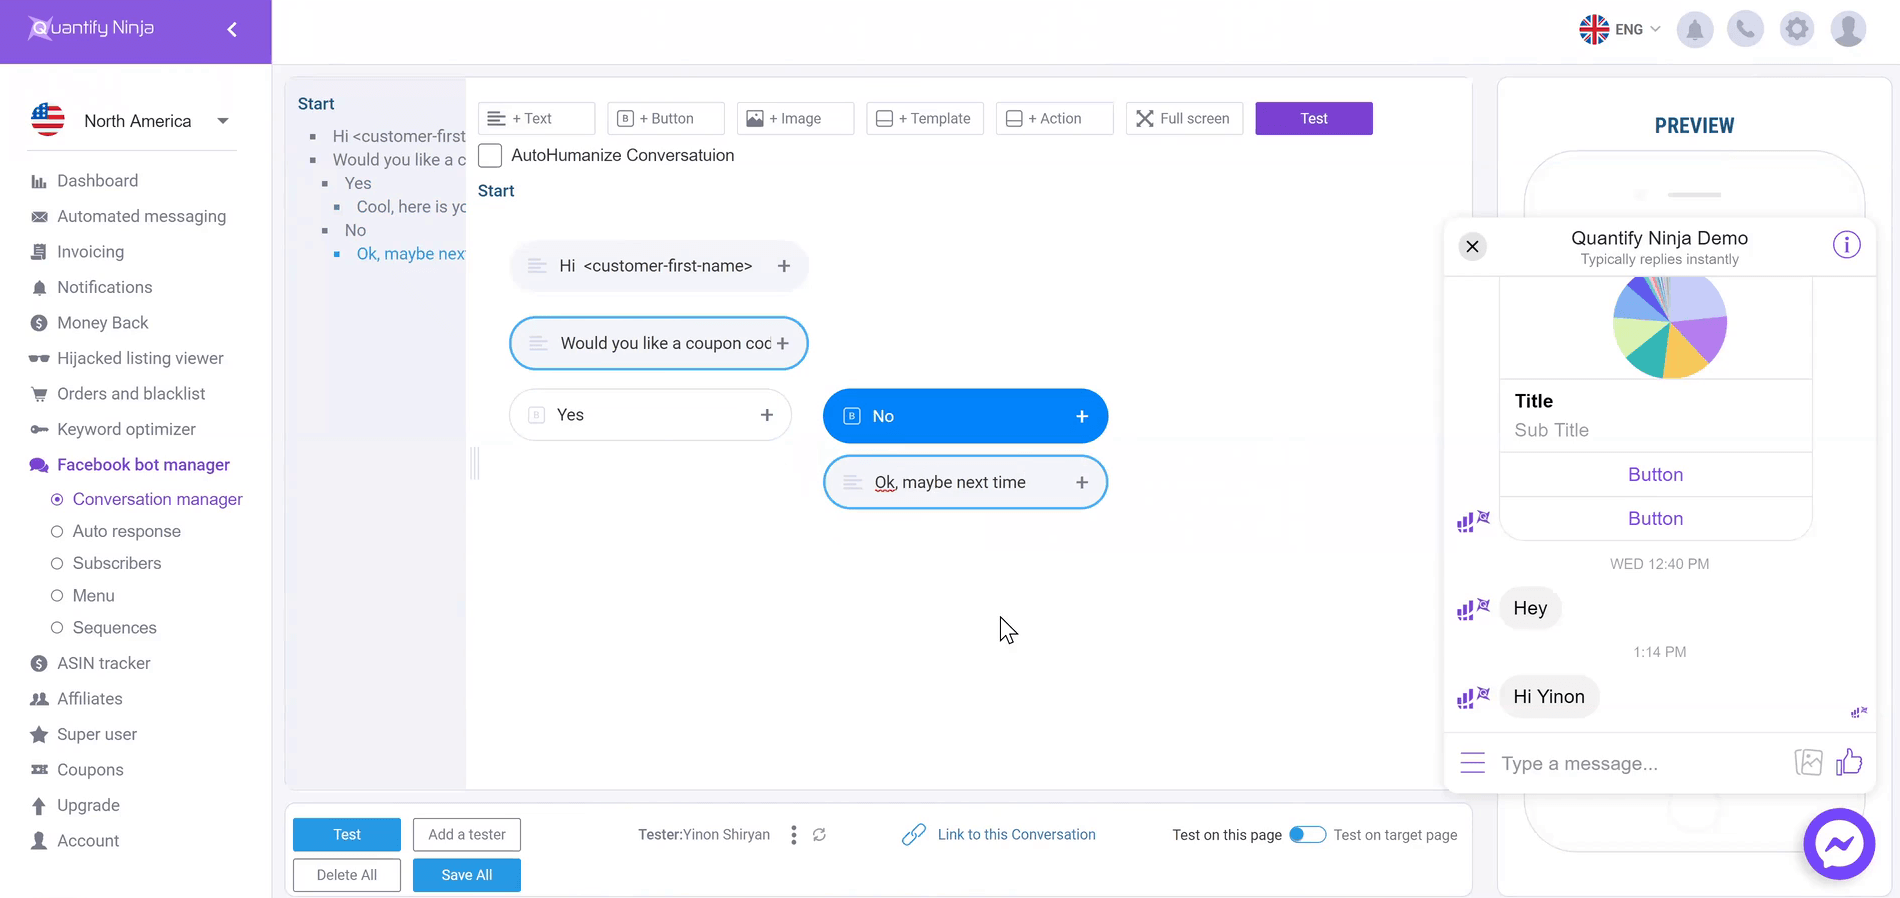
[00:43:41] Yinon: There’s more complicated component, you can add images. So if you want, you can add images and upload it from your computer, you can add a generic template, it is called generic templates. It’s like an image with buttons. So if I take an image, I’m taking an image, I’m not sure if this is a nice image, it’s just an image that I found on my computer. So I’m just adding an image. And then you can give it a title. Let’s say this is a title and the subtitle and then a button. So let’s say, give me coupon. So if in case he clicks no, you will see this template. Let’s see and test. I click on the no, and then it shows up these but it shows both actually the template and then, okay maybe next time. So if I click give me a coupon, it doesn’t do anything because we didn’t continue the flow under this button. But you can add more than one button on this component. And you can do multiple things. But I want to focus on one thing. So let’s say that this is the component that you want to share the coupon code and you ask him if you want a coupon code and when he clicks it, you show him a the coupon code. So let’s tag this button. You can set, okay, I want to tag these users with, taken a coupon code. So I’ll just name it, taken a coupon code and now it is tagged. So everyone that clicks on this button are tagged, we take in a coupon and then I can retarget them on Facebook later.
[00:45:37] Yinon: So there’s a full tutorial I can show you. There’s so many things we can speak about as building up the conversation, and I also have a video specifically on how to set up this conversation as a trigger on Facebook ad. So what you actually need to do is to Get Json, it will give you a code sample and take the code and put it in the ad setting on Facebook. And that’s how it is done. I will show videos on how to do it, maybe later in the video, so this is how you build up a conversation, really nice feature. You can test it on your page as well, not only here, you can actually test it on your target page. And another option would be to use an auto response on post so you can actually go to your Facebook and on a specific post and type and set up a keyboard where anyone that type this keyboard will have his messenger popup with a specific conversation.
[00:46:46] Yinon: Augustus I think that this Facebook bot is actually something that is both making a whole episode only on the Facebook bot because there’s so many things you can do with it. So I just try to give a glimpse of the options that we can do. So I want to just talk a few words about the subscribers. So anyone that starts talking to your bot, he is already a subscriber on your page. So anyone who actually wrote something or clicked on a specific button, you can see him on the list, you can actually contact him, you can set up a new conversation and then broadcast. So we have a broadcast button and then you can talk to them again.
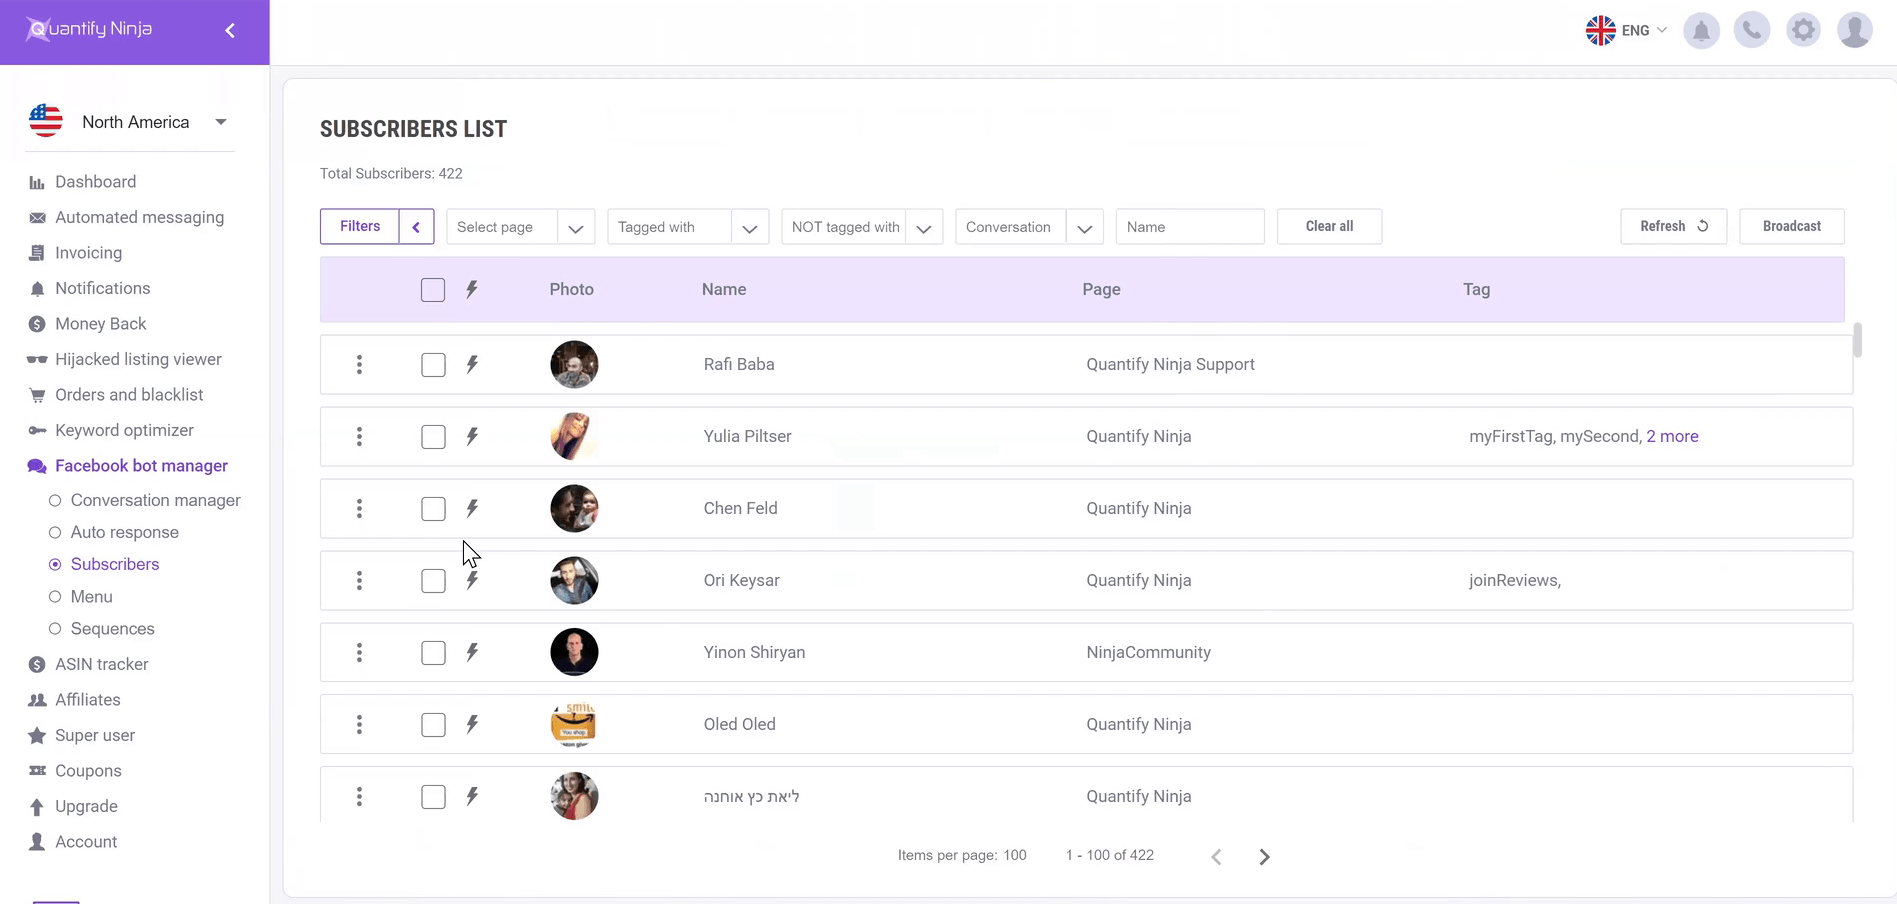
[00:47:37] Yinon: So most users what they do is that after they actually share a coupon code, they actually want to send them a broadcast 2 weeks later asking them to leave a review, which makes it a really great tool. I have many customers who actually told me that it went so well that they had to shut it down because they got too many reviews in a short period of time. So I really encourage you to learn this topic. You don’t have to use Quantify Ninja, there are plenty of tools, but I really think that Quantify Ninja fit the best for Amazon sellers.
[00:48:16] Yinon: So, I think that’s about it. I don’t want to go on everything because there’s so many things. And for every feature we have a tutorial, maybe Augustus you can post it later and our tutorials for using all the features here. But I would love to talk about things that you’re interested in right now.
[00:48:37] Augustas: Can you just in one sentence review all the missing or not covered items and features?
[00:48:44] Yinon: Yes, in one sentence, the Money Back that I didn’t talk about is a tool that actually checks your inventory and see if there are products that were not returned to Amazon, ans some customers are actually get refunds, but they do not return the product back to Amazon. So we recognize those places where they did not return the product or that they got a good will concession from Amazon or that Amazon gave a late refund because Amazon has like 30 days money back guarantee.
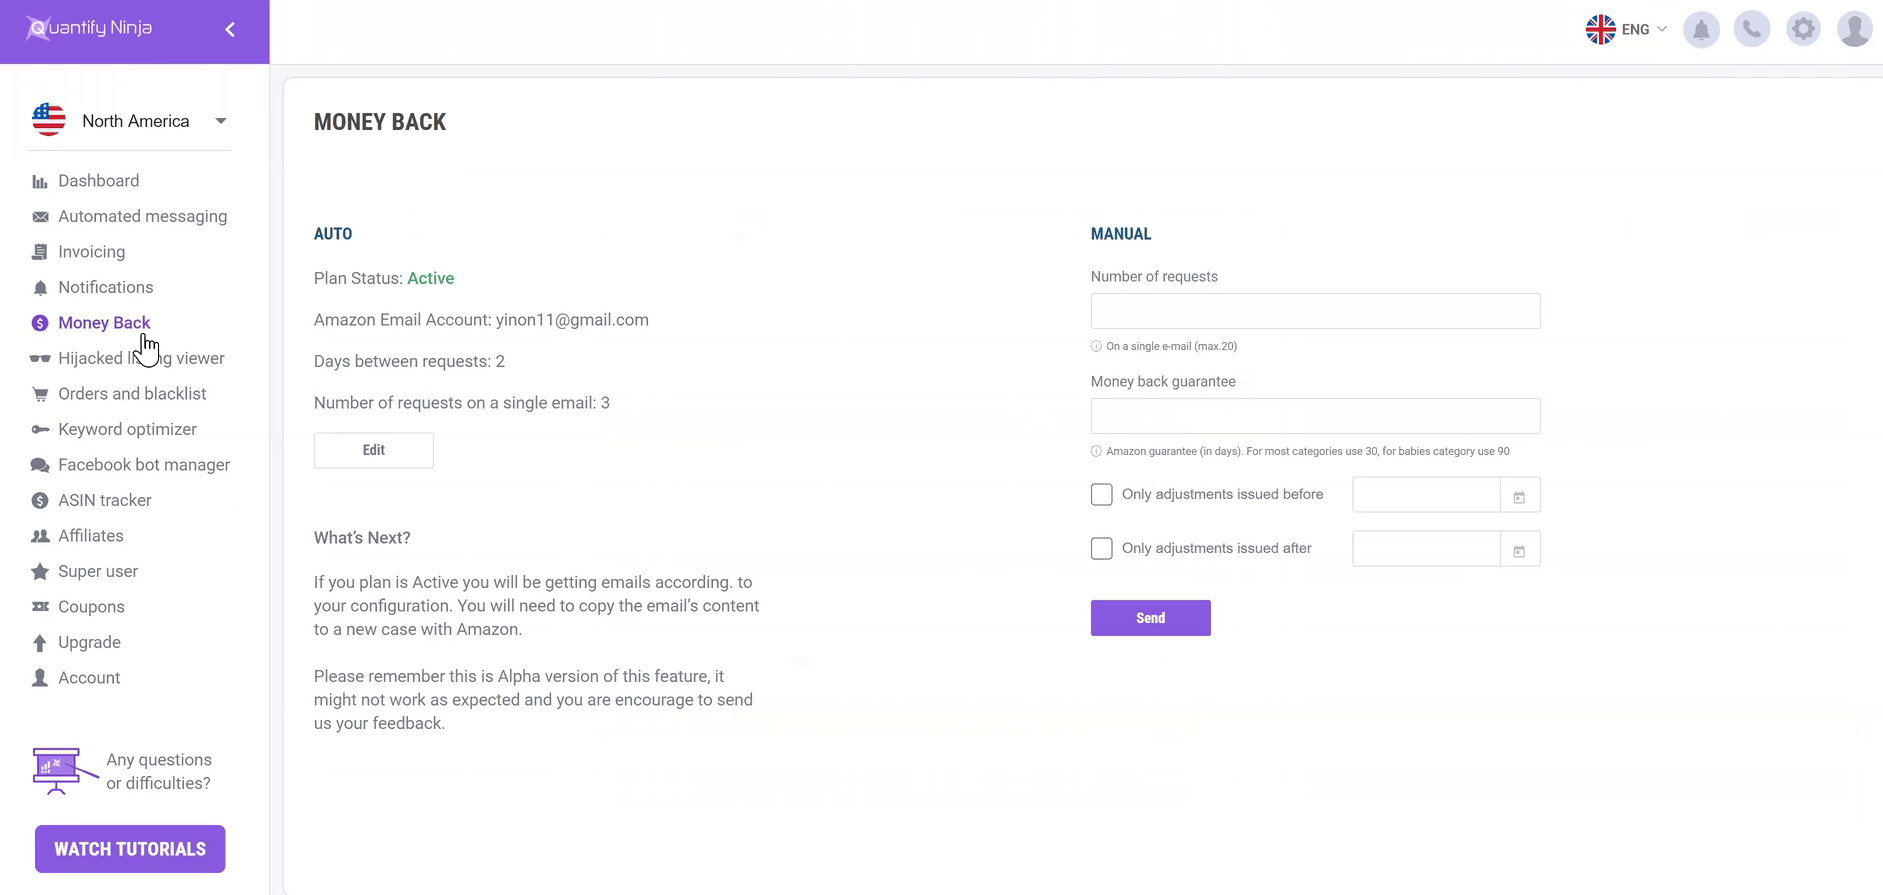
[00:49:22] Yinon: But sometimes they give a refund after more than 30 or 45 days. And then we raise up this flag and tell the user, Hey, Amazon should have reimbursed your account, but they didn’t. So you need to go to them with this specific order and ask a refund. This is the money back, the hijacked listing viewer is we actually have notifications for this, but if you want to see your products list, who can look at it, we will mark it with a Green V, all the products that you are the only one who sells the product, but you will see here in red if there are products that are competing on the buy box. So this is basically for private labellers where you do not expect to compete the buy box.
[00:50:11] Yinon: If you are selling private label, you should be the only one that sells at least in a new condition. So we also have notifications for it. But if you want to look at it, you can see here on Amazon the offers list in this section, the keyword optimizer in one sentence, it’s a simple tool that helps you avoid duplicates on the search terms on Amazon. So you can just set here in the desired keyboards, all the words that you took from any tool like google adwords, et Cetera, and you add here all the listing, the other texts that in your listing, like bullet points, description, title, everything, and it will result you all the desire keywords without the listing. So you can take just the result and put it in the back office in the search terms of the listing.
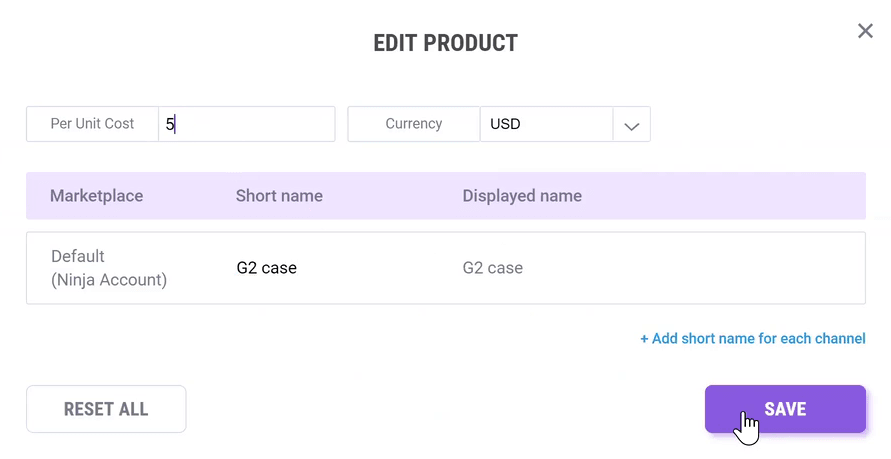
[00:51:09] Yinon: This just helps you to avoid duplicates, just saves you tons of time. Affiliate is basically for affiliates. If anyone wants to share our product, we have a special program for affiliates and Oh, let’s talk about the account because we have some nice features there, so in the account settings you can see there’s just simple things that you can do, define your email and password and the business name for the invoice, but you can also go to the product settings and see all your products. You can define a short name that will be used in Quantify Ninja and on every notification because it’s just easier to work with a short name. But you can also define the short name and you can use it in the automated messaging.
[00:52:08] Yinon: So we have a special variable products short name that instead of saying to the user, Thank you for purchasing our, and then this full title, you can just set up a short name simply by click add it and then just call it G2 case and then this would be my short name. And let’s say that this cost me $5 and I do save. And that’s it, from now on this will be the name that will be displayed everywhere in Quantify Ninja, it will not change your title on Amazon of course, so this is a very nice to use feature, you can add expenses that you have added, like photographing, things that actually you spent money on, but they are not part of the Amazon fees, storage fees, things that are outside of Amazon, that cost you money and you want to add them to the total profit of subscribing from the total profit.
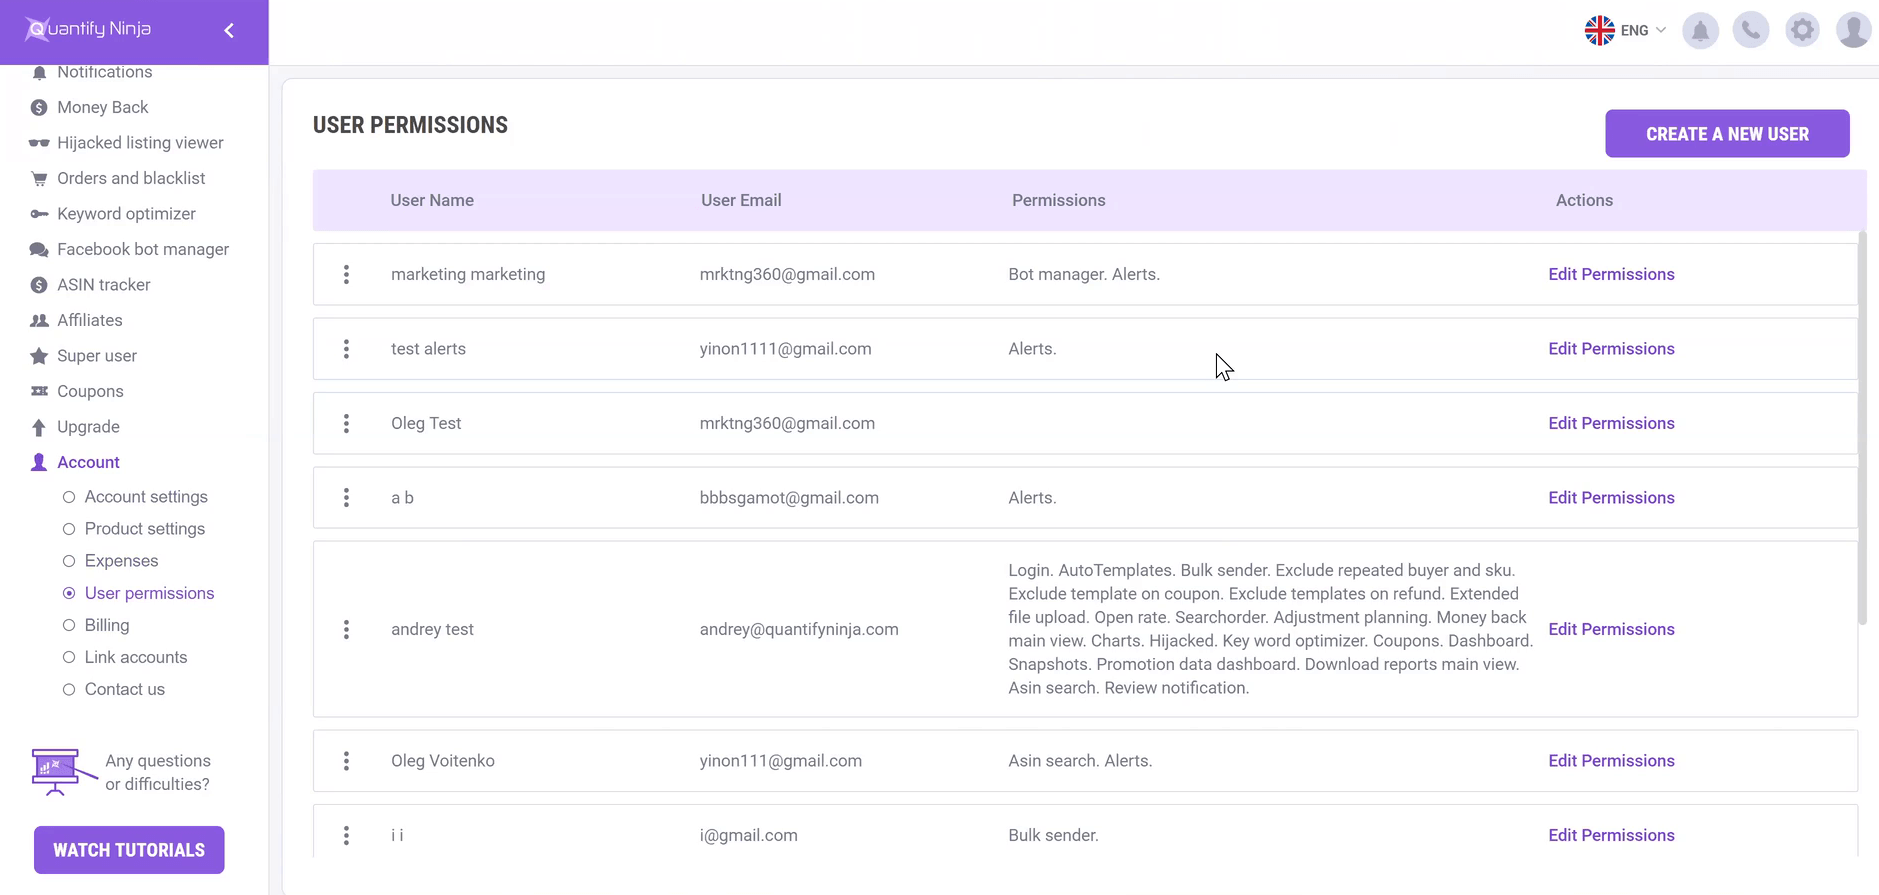
[00:53:22] Yinon: So we can add expenses. If you have a VA you can add VA’s to account. So let’s say I have a VA, but I don’t want them to have access to the dashboard because I don’t want them to know how much I earn and how much units I’ve sold. So you just want them to walk on a specific section in Quantify Ninja so you can just create a new user for your account and give him just a limited access to the system. So billing is just invoices that we send to the buyers and link accounts is a great feature. If you have multiple accounts, so let’s say you’re managing 3, 4, 5 accounts and you want to switch between the accounts easily. You don’t want to log out, log in every time so you can just Add Managed Account.
[00:54:17] Yinon: And then here in the profile image, if you click here, you see I have two accounts, but you can have as many accounts as you want. It’s a totally different accounts, but it just gives you the option to switch between the accounts for your convenience. So we have many customers that have like 5, 6 accounts, so they use this feature, it’s really nice, and you can just link any account you have with Quantify Ninja and just switch between the accounts. And that’s it. The last one is to contact us, we really encourage you to write us and say anything on your mind. We love to make changes. We’ll love to hear what you have to say. And we love to hear your opinions because when we hear the pains of the sellers, that’s what motivated us to create our next feature.
[00:55:16] Augustas: Perfect. So while we are still on the screen sharing, can we share the pricing structure?
[00:55:23] Yinon: Yes, this is under upgrade. So as I said we have two plans, both are fixed plans, fixed prices, and the first one costs $35 and it includes everything about the bot and the ASIN tracker. And those two features are in the second plan, which cost $55 a month, but both of them actually gives you the option to have unlimited access to all the features. So if you send emails, if you use invoicing, if use money back, if you use notifications, you have unlimited access, unlimited emails, all for this fixed price, but if you want also the bot manager and the ASIN tracker that would be an extra $20. Now the prices per region, so if you want to add another region, it’s not a double price.
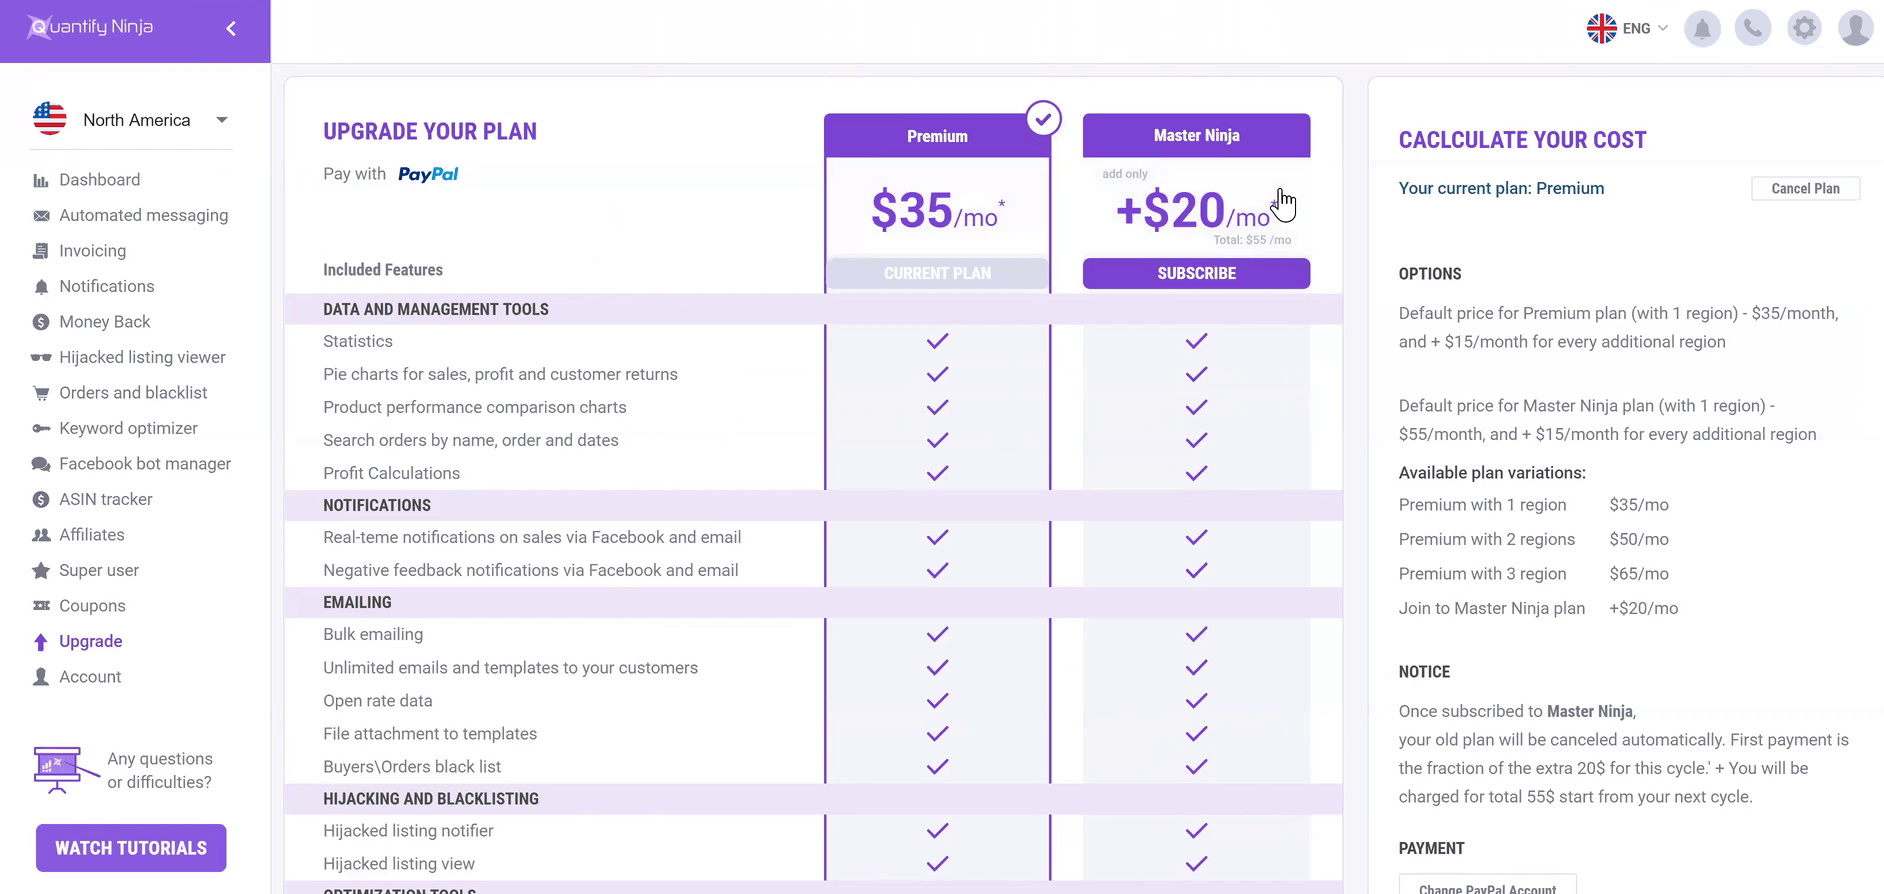
[00:56:19] Yinon: It’s an edition of $50 for every and every region and you can add it from here. This is different than adding a linked account that I showed earlier because if you add the region, if you have already in the North America, you can add any other region from here and this would be $15 per region, a linked account is what I showed earlier is when you have separate accounts, like if you have to, for example, two North accounts region, you can have it under here. You have to create another account and then if you want you can link it. So this is our pricing structure. It’s really low prices because we do it out of an ideology. We want to have a low price and give the best value for everyone.
[00:57:15] Augustas: And if someone has a North American and European region, that would be $50 and $20 extra for Master Ninja is one time.
[00:57:26] Yinon: Yes, it’s one time if you are a Master Ninja then you are Master Ninja for all the regions you have. So you don’t have to pay another $20 for every region. You’ll pay just one time, $20 per month, and then your Master Ninja on all of the regions you’re registering in.
[00:57:43] Augustas: Great. Thank you very much for this demo. And what are the future plans for the features you want to offer for Quantify Ninja users?
[00:57:53] Yinon: So we currently walking on some features, we try to do something in the head of the technology right now. So we’re trying to walk with artificial intelligence and neural network in order to provide two things that we want to walk on. The first one is the support because I know there’s so many sellers spending so much time on support and what we want to do is actually walk with artificial intelligence to recognize the tickets that you have from your customers and then comes up with an answer for your customers. So it would just save your time and you will just have to verify the answer that the system will predict. And then you just need to just go over it and then click send to send it to your buyer.
[00:58:52] Yinon: So basically what we want to do is just save your time for you or for your VA, by searching all the tickets that comes from your customers and then have the answer ready for them in advance. So this is the first thing that I’m working on. And the second thing is actually inventory management. So we want to use the same artificial intelligence to predict how many products you need to order for the next time, what is your sales quantity that you sell everyday and then predict the next shipment that you need to reorder considering multiple factors such as, lead time to ship. And based on how much time in history you want us to make the calculation, but basically work on the managing inventory issues that we don’t currently have in Quantify Ninja.
[01:00:00] Augustas: Perfect. Thank you very much, and good luck in your business. Bye bye.
[01:00:06] Yinon: Thank you.